Sunday, 12 June 2022

Kotlin Delegation

In object-oriented programming, delegation refers to evaluating a member (property or method) of one object (the receiver) in the context of another original object (the sender). 


Delegation is a design pattern in which an object handles a request by delegating to a helper object, called the delegate. The delegate is responsible for handling the request on behalf of the original object and making the results available to the original object.  


Kotlin supports “delegation” design pattern by introducing a new keyword “by”. Using this keyword or delegation methodology, Kotlin allows the derived class to access all the implemented public methods of an interface through a specific object


Delegation should be used when:

  • Any components that behave identically, but we realize were it will have some upgradation on top of it in future point of time where we do our own logical implementation and expose the results.  For E.g. We can take an example of Analytics class, where instead of directly using the analytics method we can have our delegation and use the param to handle the screen views and event logging.
  • Place where we feel delegate would be the better than inheritance because, it doesn’t force you to define all the methods of the super class, you can use or override only the methods that really needed.  For e.g. here you can refer the code below that PaymentProcess doesn’t enforced to override the method (Kotlin), but if really needed we can override and do our implementations.
  • If we want to extend the behavior of classes that we cannot or don’t want to subclass for the below reasons For E.g. here you can see in the below code snippet Payment classes (CashPayment, UPIPayment, CardPayment) are can’t be inherited.
    • Restricted to share or disallowed to create a hierarchy (Class marked as final)
    • Planning to expose the limited or different API methods by consuming the existing code functionality and also we may add our feature update. 
    • Planned to hide the serious implementation from the calling code.


Example: This will be very simple and self-explanatory code snippet, here we are having an interface IPayment for the payment and it would track the mode of payment happens, and there would be an implementation classes CashPayment, UPIPayment, CardPayment of different mode of payment (Cash, Card and UPI).   There in PaymentProcess class the delegation will be happen through the interface.  Also the method paymentProcess in java and processPayment in Kotlin does the payment process.   

Comparatively with Java and Kotlin, In Kotlin we avoid lot of boilerplate code because of delegation using “by”, else in java we are mandatory to do the implementation of all interface method (see in this example I have used only one interface method, so if it is more than, it would be more override method in PaymentProcess.java class). 


Java Style of Delegate


Kotlin Style of Delegate:

Happy Coding :-)

Sunday, 5 June 2022

SAM - Functional Interface


Almost we all of us have seen code like view.setOnClickListener { } or view.setOnLongClickListener { } in Kotlin, and when you click on it to see the source code it will show you the Java OnClickListener interface. Is it a kotlin extension? How can we call our custom listener like this? Let’s see the answer to all of these now.

This syntax is not an extension, it is SAM conversion, SAM stands for Single Abstract Method interface and it’s called also Functional interface which is an interface with only one non-default method (abstract method) and any number of default methods (non-abstract methods), for examples In the JDK we have Runnable class which has only one method called run and in Android SDK we have OnClickListener, OnLongClickListener etc..

How can we create a custom functional interface?

In Kotlin starting from Version 1.4, we can declare a functional interface in Kotlin, we need to use the fun modifier before to the interface keyword.
fun interface MyInterface {
    fun aMethod()
}
Creating a function with the functional interface as param

fun runMyInterface(fi : MyInterface) { ... }


We can pass MyInterface as an anonymous object 

runMyInterface(object : MyInterface {

    override fun aMethod() {

        println("Welcome to www.rajendhiraneasu.in")

    }

})

For functional interfaces, SAM conversion can be achieved through lambda expressions, which makes the code more concise and more readable.  Using lambda expressions can replace manually creating classes that implement functional interfaces. Through SAM conversion, Kotlin can convert any lambda expression whose signature matches the signature of a single abstract method of an interface into an instance of a class that implements the interface.  Please see the above anonymous reference with lambda expressions as below

runMyInterface ({ println("Welcome to www.rajendhiraneasu.in") })


Also, in Kotlin if your last parameter is functional interface you can move your lambda out the brackets ()

runMyInterface {

    println("Welcome to www.rajendhiraneasu.in")

}


Now you can realize that setOnClickListener { } is just because this method takes functional interface which is OnClickListener as a parameter.

Eg: Let’s see with the use case to get the Students Grade of different class levels.
 
// Class Levels
const val PRIMARY_SCHOOL = 1
const val HIGH_SCHOOL = 2

// Data Class holds the student details
data class StudentMarks(val sName: String, val classLevel: Int, val sAvg: Double) {
    fun getStudentGrade(predicate: GradePredicate) = predicate.getGrade((sAvg))
}

// Functional interface (SAM)
fun interface GradePredicate {
    fun getGrade(avg: Double): String
} 

// Grade Predicate definition as lambda 
val primarySchoolGrade = GradePredicate {
    when {
        it > 90 -> "A+"
        it > 80 -> "A"
        it > 65 -> "B"
        it > 45 -> "C"
        it > 34 -> "D"
        else -> "F"
    }
}

val highSchoolGrade = GradePredicate {
    when {
        it > 80 -> "Very Good"
        it > 60 -> "Good"
        it > 34 -> "Fair"
        else -> "Fail"
    }
}

// Lambda expression to select the grade predicate based on the class level 
val gradeSel by lazy { { classLevel: Int -> if (classLevel == PRIMARY_SCHOOL) primarySchoolGrade else highSchoolGrade } }

fun main() {
 val studentList = listOf(
        StudentMarks("Ragavan", PRIMARY_SCHOOL, 92.79),
        StudentMarks("Rajeevan", PRIMARY_SCHOOL, 65.15),
        StudentMarks("Rajeevan", PRIMARY_SCHOOL, 52.23),
        StudentMarks("Arun", HIGH_SCHOOL, 83.21),
        StudentMarks("Harish", HIGH_SCHOOL, 63.56)
    )

    println("Name || Grade")
    studentList.forEach {
        println(
            "${it.sName} ||  ${
                it.getStudentGrade(gradeSel(it.classLevel))
            }"
        )
    }
}
 
Output:


Sunday, 15 May 2022

Kotlin Enum Class versus Sealed Class

 Enum Class: 

  • It helps to represent a constant set of possible options and values i.e. group of constants, 
  • This can be used when a variable can only accept value out of a small set of known values 
  • It will increases the compile-time checking and avoid errors from passing in invalid constants. 
  • Easy to document which values are valid to use and what it implies.
For example, enumeration defines as like as below 
Flags accounting ledger (DEBIT, CREDIT),
Factory outlet process, (CRUSHING, WINDING, DRYING)
A concrete set of payment mode (UPI, NEFT, IMPS, AEPS) 
Handling API request status (LOADING, SUCCESS, RETRY, FAILURE), etc.

It holds the value which are always specific to the item, this value is mutable and static to the each items, this functionality is often used to attach some constant values on each item through the constructor.

Kotlin enums have methods and their implementations are also specific to the items, when we define them, enum class must have the abstract method, and each item mandatory to override it.
enum class Flavours(val preparationTime: Long) {
    VANILLA(3000L) {
	  // Even I don’t have the discount, I need to be overrided
        override fun discount(amt: Double): String {
            return ""
        }
    },
    CHOCOLATE(5000L) {
        override fun discount(amt: Double): String {
            return "Discount is $amt"
        }
    },
    COOKIES_CREAM(1000L) {
        override fun discount(amt: Double): String {
            return "Discount is $amt"
        }
    };

    var brand: String = "Amul"
    abstract fun discount(amt: Double): String
}

val flav1 = Flavours.COOKIES_CREAM
flav1.brand = "Arun"
val flav2 = Flavours.COOKIES_CREAM

// changing the brand of flav2 but it affects flav1 too, because It is item specific
flav2.brand = "Ponlait"   

val flav3 = Flavours.CHOCOLATE
flav3.brand = "Vadilal"
    
println("${flav1.name} | ${flav1.brand} | ${flav1.discount(7.5)}")
println("${flav2.name} | ${flav2.brand} | ${flav2.discount(2.5)}")
println("${flav3.name} | ${flav3.brand} | ${flav3.discount(3.5)}")

Output:
COOKIES_CREAM | Ponlait | Discount is 7.5
COOKIES_CREAM | Ponlait | Discount is 2.5
CHOCOLATE | Vadilal | Discount is 3.5

Here in the above code snippet we are able to see the brand will be the value which is specific to item (refer the comment and output value highlighted) and discount function is mandatory to override on all the enum values.  

Therefore iterating over enum values is easy, and their serialization/deserialization is simple and efficient (as they are generally represented just by name) and automatically supported by most libraries for serialization (like Gson, Jackson, Kotlin Serialization, etc.). They also have ordinal, and automatically implemented toString, hashCode and equals. 

Sealed Class: 
  • It helps to represent constrained hierarchies in which an Object can only be of one of the given types.
  • This class can have a specific number of subclasses i.e. restricted subclass hierarchy and each can be handled through multiple instances, 
  • It is an abstract classes (no possibility to create an instance)
In case, if we are sharing our code as a compiled jar/aar file to our client with the sealed class in it.  Our client can’t inherit or subclass our sealed classes.

Code Snippet for Reference:

sealed class Flavours(val preparationTime: Long)

class Vanilla(preparationTime: Long) : Flavours(preparationTime) {
    fun getCreamType() {
        println("Inside Vanilla")
    }
}

class Chocolate(preparationTime: Long, val isDiscount: Double) : Flavours(preparationTime) {
    fun knowChocolateType() {
        println("Inside Chocolate")
    }
}

class CookieCream(preparationTime: Long, val isDiscount: Double, val isSmokey: Boolean) : Flavours(preparationTime) {
    fun getCookieType() {
        println("Inside Cookie")
    }
}

fun getMyFlavor(flavorType: Flavours) = when (flavorType) {
    is Chocolate -> {
        flavorType.knowChocolateType()
    }

    is CookieCream -> {
        flavorType.getCookieType()
    }

    is Vanilla -> {
        flavorType.getCreamType()
    }
} 

//While calling this function
getMyFlavor(Chocolate(3000L, 10.50))
getMyFlavor(CookieCream(3000L, 10.50, true))
getMyFlavor(Vanilla(3000L))

Output:
Inside Chocolate
Inside Cookie
Inside Vanilla

Other Uses Case – Code Snippet:

// Handling Ledger balance & API Response along with generics (Covariance)
sealed class LedgerExpenses<out D, out C>
class Expense<D>: LedgerExpenses <D, Nothing>()
class Incomes<C>: LedgerExpenses <Nothing, C>()

// Handling multiple Eye lense
sealed class EyeLense
object IndianLense(val manuf:String, val degree:Double): EyeLense ()
object CollaborationLense: EyeLense (val degree:Double): EyeLense ()
class CustomizedLense(val src: String, val owner:Owner): EyeLense ()

// Handling API Response along with generics (Covariance)
sealed class Response<out R>
class Success<R>(val value: R): Response<R>()
class Failure(val error: Throwable): Response<Nothing>()

Conclusion:


Similarities:
  • The set of values for an enum type is also restricted like the sealed class restricting the subclasses.
  • Enum and sealed class increase the compile-time checking by restricting the constants or types to be matched at compile-time instead of runtime check.

Differences:
  • Each enum constant exists only as a single instance, whereas a subclass of a sealed class can have multiple instances, each with its own state. The state of an object is stored in fields (Variables).

Final Touch…
  • Enum handles with concrete set of values, whereas sealed classes uses concrete set of classes. 
  • Enum have the methods values() and valueOf, so we can serialize and de-serialize the values. 
  • Enums have ordinal and we can hold constant data. 
  • Sealed classes can hold instance-specific hierarchy. 
  • Sealed class helps to define on our own custom set of objects and we can use them with the multiple instance.
  • Sealed class is packed and secured way of creating a hierarchy of defined instance and those definitions are restricted to inherit.  (It violates the Open Close Principle, but this required for such an use cases)

Sunday, 24 April 2022

Android registerForActivityResult


As a very fundamentals that we Android developer has learned, and it shows the way for communicating between two components. The provided startActivityForResult(..), onActivityForResut(..) was simple enough to implement for many years, but now we are hard to accept the change, it would be the evolution of language and its features which really helps to do the code in concise way.  So, as per this we see some pitfalls on the earlier approach like

  • Difficult to search the caller function in our project, 
  • Tedious in getting and handles the results on the fragment, 
  • Chance of missing out the results when the component is recreated, 
  • Conflicts with the same request code, 
  • Handling self-permissions request etc.
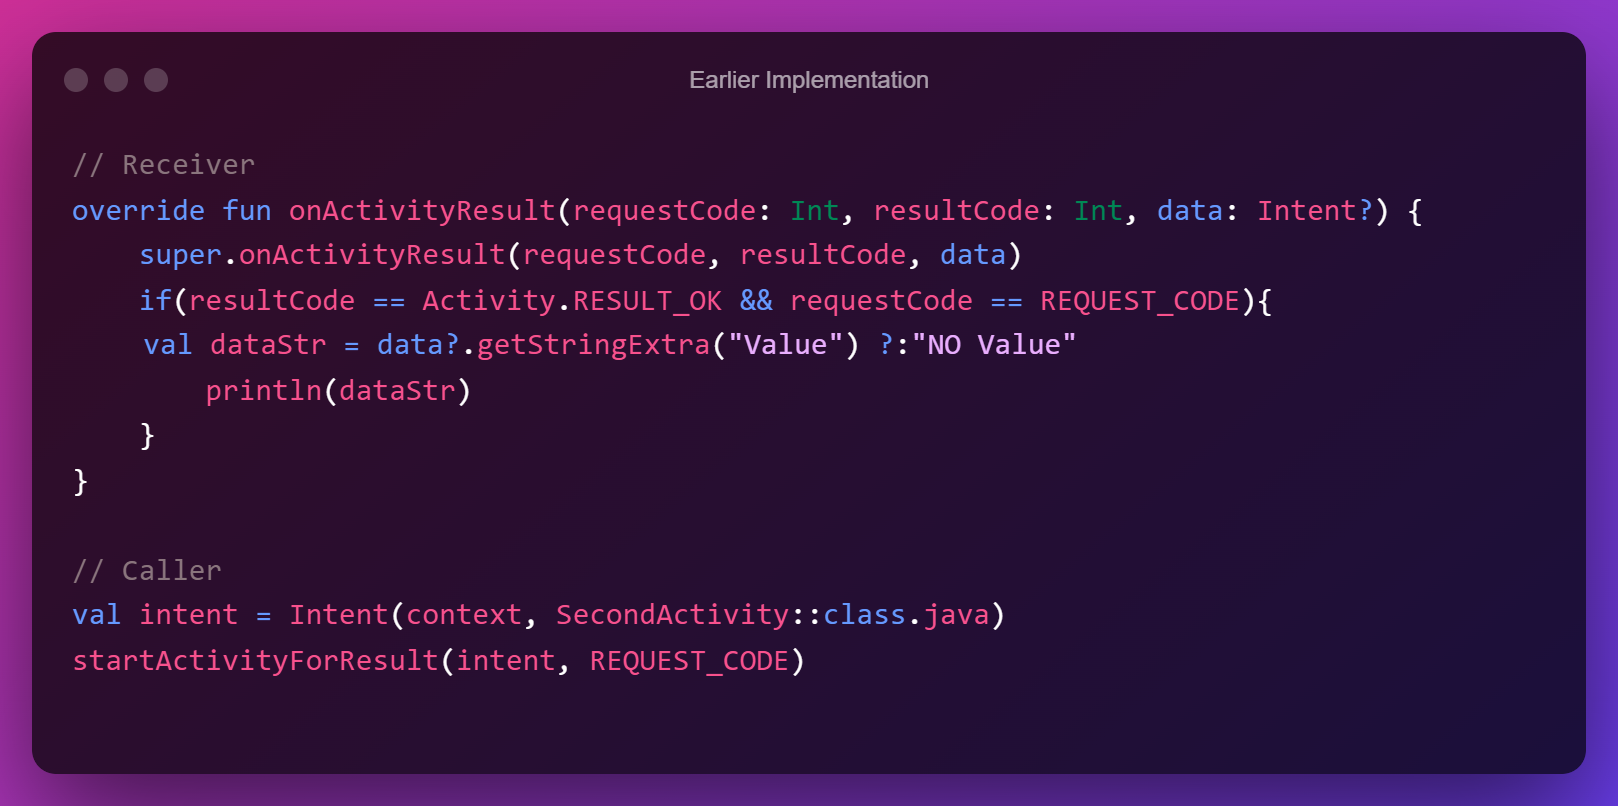
Earlier Approach:


Now, with updates to androidx.activity:activity-ktx to 1.2.0. It has deprecated startActivityForResult in favor of registerForActivityResult, notable thing is this implementation avoids and taken care of the above mentioned issues.  Notable thing is here we no need of permission request code, it will be taken care automatically. 

Let’s see the new implementation on implicit and explicit calls with registerForActivityResult, ActivityResultLauncher, ActivityResultContracts, ActivityResultCallback.

The class registerForActivityResult helps to register with ActivityResultContracts (which handles explicit or implicit calls) and other param as the callback action as lambda blocks with (ActivityResultCallback) and returns the launcher (ActivityResultLauncher) object, where we use the launch (...) method with params.

New Approach:

Explicit Calls: We all know calling another activity or component and getting result from there on finish on explicit intent calls.


In the above approach we are creating our explicit launcher which gets data on the resultant callbacks, so this way it would be easy to define our multiple launcher and those are handled independently.  Here the same approach can be used on the Fragment as well.

Implicit Calls: The implicit calls which invoke the system contracts such as take a Picture from camera gallery, accessing contacts, etc.  Please refer the below link for all available ActivityResultContracts


Conclusion:  The approach towards registerForActivityResult is really clean & concise, IMO below are the pros 
  • Improved code readability, here we no need to jump between onActivityResult() & startActivityForResult.
  • ActivityResultLauncher is returned by registerForActivityResult and this used to launch the components, the input parameter is clearly defined to get the desired results is the callback.
  • There is no Boilerplate code for requesting permission from the user.


Saturday, 2 April 2022

Get context in Jetpack Compose

In Android Compose, you can get the context by using the LocalContext, but it should be call'd from the composable function / scope.

val context = LocalContext.current

In the below code snippet we are retrieving the context and show a toast message inside the composable.

@Composable
fun MyToastDisplay(name: String) {
    val ctx = LocalContext.current
    Column(
        Modifier
            .fillMaxHeight()
            .fillMaxWidth(), verticalArrangement = Arrangement.Center,
        horizontalAlignment = Alignment.CenterHorizontally
    ) {
        Text(text = "Hello $name", color = Color.Red,
            modifier = Modifier
                .background(Color.Green)
                .clickable {
                    Toast
                        .makeText(ctx, "Welcome to the Compose World", Toast.LENGTH_SHORT)
                        .show()
                })
    }
}

If you use the LocalContext.current directly inside the clickable function results in the compilation error “@composable invocations can only happen from the context of an @composable function”.


Since the LocalContext.current is composable, you can’t invoke it within the non-composable function.  i.e. clickable function is not a composable function and so can’t accept other composable functions. 

Alternatively, you can get the context outside the clickable function scope and use, as shown in the above code snippet.


Happy Coding :-)

Sunday, 27 March 2022

Generics – Out, In

Generics feature is template kind of implementation approach, which allow us to define classes, methods and properties which are accessible using different data types and keep a check of the compile-time type safety.


A generic type is a class or function that is parameterized over types. We always use angle brackets (<>) to specify the type parameter in the program.


Pros:

Compile time safety: Generics code is checked at compile time for the parameterized type so that it avoids run time error


Type casting: No need to typecast the object.


Type safety: Generic allows only single type of object at a time.


If you ever defined generic in Kotlin, you’ll notice many a times, it would propose to use the in or out keyword to define the generic. It puzzles me at a start on when which is used, and for what.

Formally, this is a way to define Covariant & Contravariance. Let’s see with the example in simple Word Processing and its implementation on Consumer (User) & Producer (Output Mode).


Out (Covariant):  If your generic class/interface only use the generic type as output of its function/s, it won't allow us to add the setter function with T


interface ProduceOutput<out T> {
    fun getContent(): T
}

This ProduceOutput interface, as it is mainly to produce output of the generic type. 
Side Note: produce = output = out

In (Contravariance): If your generic class/interface only use the generic type as input of its function/s, it won't allow us to getter function with T

interface ConsumeInput<in T> {
    fun consumeContent(data: T)
}

This ConsumeInput interface, as it is mainly to consuming the generic type. 
Side Note: consume = input = in


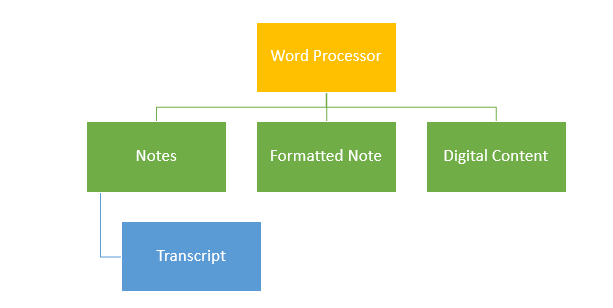
Before we see how the implementation on Producer and Consumer, lets create a necessary class hierarchy, which is going to handle the publishing industry on their document processing with their consumer base.


open class WordProcessor(val content: String, val isStyle: Boolean = false, val isAnimated: Boolean = false) {
    fun show() {
        println("Type : $content | Style: $isStyle | Animation: $isAnimated")
    }

    fun showConsumer() {
        println("Input : $content | Style: $isStyle | Animation: $isAnimated")
    }
}

open class Notes(input: String) : WordProcessor(input)
class Transcript(input: String) : Notes(input)
class FormattedNote(input: String) : WordProcessor(input, true)
class DigitalContent(input: String) : WordProcessor(input, true, true)

Implementation classes for producing the output via software tools as below

class GeneralProcessing : ProduceOutput<WordProcessor> {
    override fun getContent(): WordProcessor {
        return WordProcessor("Content Processor General")
    }
}

class Notepad : ProduceOutput<Notes> {
    override fun getContent(): Notes {
        return Notes("Notepad Content")
    }
}

class MSWord : ProduceOutput<FormattedNote> {
    override fun getContent(): FormattedNote {
        return FormattedNote("Formatted Content")
    }
}

class Flash : ProduceOutput<DigitalContent> {
    override fun getContent(): DigitalContent {
        return DigitalContent("Graphic Content")
    }
}

class SubEditPlayer : ProduceOutput<Transcript> {
    override fun getContent(): Transcript {
        return Transcript("Subtitle Content")
    }
}

For 'out' generic, we could assign a class of subtype to class of super-type, Please check out the comments in the code.

/*out -- This subtype class will be assigned only to the same type or super type class*/
    
val meetingMinutes: ProduceOutput<WordProcessor> = Notepad()
val wallPoster: ProduceOutput<WordProcessor> = MSWord()
val flashGame: ProduceOutput<WordProcessor> = Flash()
val osDefaultDoc: ProduceOutput<WordProcessor> = GeneralProcessing()
val youtubeSubtitle: ProduceOutput<Transcript> = SubEditPlayer()

// Eg: out compiler error
// val meetingRecording:ProduceOutput<DigitalContent> = GeneralProcessing() // Error
// val poster:ProduceOutput<Notepad> = GeneralProcessing() //Error
val twoDGame: ProduceOutput<DigitalContent> = Flash() // This works - Same Class Type
val subTile: ProduceOutput<WordProcessor> = SubEditPlayer() // This works --  subtype assigned to supertype

meetingMinutes.getContent().show()
wallPoster.getContent().show()
flashGame.getContent().show()
osDefaultDoc.getContent().show()
youtubeSubtitle.getContent().show()
twoDGame.getContent().show()
subTile.getContent().show()

Implementation classes of the users who consumes i.e. prepare or use these tools

class GeneralReviewer : ConsumeInput<WordProcessor> {
    override fun consumeContent(data: WordProcessor) {
        println("GeneralReviewer -- Review the content")
        data.showConsumer()
    }
}

class Reporter : ConsumeInput<Notes> {
    override fun consumeContent(data: Notes) {
        println("Reporter - Taken Rough Notes")
        data.showConsumer()
    }
}

class ContentDesigner : ConsumeInput<FormattedNote> {
    override fun consumeContent(data: FormattedNote) {
        println("Designer - Formatted the content")
        data.showConsumer()
    }
}

class GraphicDesigner : ConsumeInput<DigitalContent> {
    override fun consumeContent(data: DigitalContent) {
        println("Graphic Designer -- Added Animation Effects to the content")
        data.showConsumer()
    }
}

class SubtitleWriter : ConsumeInput<Transcript> {
    override fun consumeContent(data: Transcript) {
        println("Subtitle Writer -- Updated subtitle content")
        data.showConsumer()
    }
}

For ‘in' generic, we could assign a class of super-type to class of subtype, Please check out the comments in the code.

/*in -- This supertype class will be assigned only to the same type or subtype class*/

val takeNotes: ConsumeInput<Notes> = Reporter()
val pageMaker: ConsumeInput<FormattedNote> = ContentDesigner()
val adFilm: ConsumeInput<DigitalContent> = GraphicDesigner()
val generalContent: ConsumeInput<WordProcessor> = GeneralReviewer()
val subTag: ConsumeInput<Transcript> = SubtitleWriter()

// Eg: in compiler error
// val takeNotes2: ConsumeInput<WordProcessor> = Reporter() // Error
// val pageMaker2: ConsumeInput<WordProcessor> = ContentDesigner() // Error
// val adFilm2: ConsumeInput<WordProcessor> = GraphicDesigner() // Error
// val tagline: ConsumeInput<WordProcessor> = SubtitleWriter() // Error
val generalContent2: ConsumeInput<WordProcessor> = GeneralReviewer() // No Error Same Type
val subTag2: ConsumeInput<Transcript> = GeneralReviewer() // No Error -- supertype assigned to subtype

takeNotes.consumeContent(Notes("Hello, Welcome to meeting"))
pageMaker.consumeContent(FormattedNote("Thank you all"))
adFilm.consumeContent(DigitalContent("BGM Rocks"))
generalContent.consumeContent(WordProcessor("Great to review"))
generalContent2.consumeContent(WordProcessor("GeneralContent2: Great to review"))
subTag.consumeContent(Transcript("Display at the bottom"))
subTag2.consumeContent(Transcript("Subtag 2: Display at the bottom"))

Very simple way to remember In and Out to be used on the implementation.  Also, importantly if anything we do mistakes, it will stop us at the compile time itself.  

Use IN => Super Type could be assigned subtype
Use OUT => Sub Type could be assigned to Super Type


Saturday, 5 March 2022

Value Class Kotlin

Value class adds attribute to a value and constraint it’s usage. This class is nothing but a wrapper around a value, but the Kotlin compiler makes sure there is no overhead due to wrapping.


Classes in Kotlin solve two problems:
  1. They convey meaning through their name and make it easier for us to understand what kind of object is passed along.
  2. They enforce type-safety by making sure that an object of class A cannot be passed to a function that expects an object of class B as an input parameter. This prevents serious bugs at compile-time.

Primitive: ❌
Primitive types like Int, Boolean, String or Double also enforce type-safety (you can’t just pass a String where a Boolean is expected), but they don’t really convey a meaning (other than an object being a number of a certain format, for example).

A Double could be pretty much anything: a temperature in degrees Celsius, a weight in kilograms, or your screen’s brightness level in percent. All we know is that we’re dealing with a floating-point number with double precision (64 bits), but it doesn’t tell us what this number represents. For that reason, the semantic type-safety is lost.

Assume below example, there is a function we are about to pass two String param (username and password).

fun getAuthToken(username:String, password:String) {
....
}

see to the above function we are able to pass the param like this and which is wrong doesn't care at the compiler level. (even we have named params both accepts the String), Hence here primitives fails.

val uname = "juno ravi"
val pwd = "P@ssw0rd!123"

val token = getAuthToken(pwd, uname) 

This programming error cannot be detected at compile-time and will most likely lead to unexpected behavior. 💥

There are different approaches to solving the two problems mentioned above. We could just wrap a primitive type in a class, but that comes with a lot of overhead. So let’s see how we can tackle these problems above with

  • data classes, 😈
  • type aliases,  😜
  • and value classes 😎

Data classes: Instantiating data classes is expensive. Primitive values can be written to the stack which is fast and efficient. Instances of data classes are written to the heap, which takes more time and memory.

data class Username(val username: String)
data class Password(val password: String)

fun getAuthToken(username:Username, password:Password) {
....
}

with the above implementation is able to achieve but it is too costly process, comparatively if primitive took 2.x milliseconds means, it will take 8.x milliseconds for the single process.  Hence it is not advisable to do 😈

Type aliases: From the below Example, String & Username and Password are synonyms.
Whenever the compiler sees Username/Password, it basically replaces it with String and moves on.

typealias Username = String
typealias Password = String

Since our new Username/Password type alias is now equal to String, hence it works as same as primitvies which we have seen above, it also receives the same optimization treatment as Primitive but loses the typesafety. 😜

Value classes: It looks pretty similar to data classes. The signature looks exactly the same, except that instead of data class the keyword is value class, also there should be @JvmInline annotation to that class due to the Valhalla JVM release in future (currently JVM supports value class on the built in primitive types).  Important thing is the value class accepts only one constructor param.  

Since this value class acts as a wrapper to that variable, it also receives the same optimization treatment as Primitive which we can see it on the below screenshot on the highlighted section of the Kotlin byte code where as uname is referred it as Username class type, but pwd is referred as String value type, because it is defined with a value class 😎


Side Note: 

Since Kotlin 1.2.xx, we have inline classes, the old name for the value class. Since the class is not actually inlined in comparison to the inline function, it has been renamed to value class and the inline keyword is deprecated from Kotlin 1.5

Happy Coding :-)

Saturday, 26 February 2022

String concatenation using listOfNotNull & joinToString - Kotlin

data class User(val fName: String?, val mName: String?, val lName: String?)
val users = listOf(
        User("Ragavan", null, "V.S."),
        User("Rajeev", "Anbu", "Devan"),
        User("Ravinder", null, null),
        User("", "", ""),
        User(null, null, null)
    )
users.map {
        listOfNotNull(it.fName, it.mName, it.lName)
        .joinToString(" ").trim().takeIf { it.isNotEmpty() } ?: "NA"
}.forEach(::println)

Output:

[Ragavan V.S., Rajeev Anbu Devan, Ravinder, NA, NA]

In the above example here we are using the listOfNotNull method which implicitly handles the null check and ignore the same, then we are easy to concatenate the data using joinToString(...) method. 

Sunday, 16 January 2022

Android FAB Action to appear across the Application

Recently we got a requirement to an existing product and which have some legacy implementation too. Here the requirement to have a FAB (Chat Bot) action to be available on all the application screens (Activity).

Discussion where went like below:

1. Adding FAB to all the activity is a very tedious process, even creating a common layout and add using <include> in all layout also not that simple task. 😟 (Bad Practice too)

2. Will create a simple FAB Action class and planned to initialize it in all the activity class, since it is also a required some more efforts to update the initialization code in all the activity classes. (This implementation will reduces the effort but not fully, It helps to update on our Common BaseActivity and few other independent Activities by doing the initialization)  😌   

3. Finally Achieved!..  Implemented through Application class and ActivityLifecycleCallbacks, which made the implementation easier to work seamlessly across the application. 😎

FabButton

object FabButton {
    fun init(activity: Activity, savedInstanceState: Bundle?=null) {
        val root: ViewGroup = activity.window.decorView as ViewGroup
        val fab = FloatingActionButton(activity).apply {
            id = View.generateViewId()
            setImageResource(android.R.drawable.sym_action_chat)
            elevation = 2f
            imageTintList = ColorStateList.valueOf(Color.WHITE)
            backgroundTintList = ColorStateList.valueOf(Color.RED)
            size = FloatingActionButton.SIZE_NORMAL
            isFocusable = true
            layoutParams = FrameLayout.LayoutParams(
                FrameLayout.LayoutParams.WRAP_CONTENT,
                FrameLayout.LayoutParams.WRAP_CONTENT
            ).apply {
                gravity = Gravity.BOTTOM or Gravity.END
                setMargins(24, 24, 24, 24)
            }
        }
        fab.setOnClickListener {
            Toast.makeText(activity, "Yes, May I help you?", Toast.LENGTH_SHORT).show()
        }
        root.addView(fab)
    }
}

Activity

class FirstActivity : AppCompatActivity() {
    override fun onCreate(savedInstanceState: Bundle?) {
        super.onCreate(savedInstanceState)
        setContentView(R.layout.activity_second2)
        FabButton.init(this)  // See here the fab initialization
    }
}

Later as per the #3, we found an other option instead of initializing the FabButton.init(this) to all the activities, implementing the below things resolved the issue without doing a larger code change.  

class TrailsApplication : Application(), Application.ActivityLifecycleCallbacks {
    override fun onCreate() {
        super.onCreate()
        registerActivityLifecycleCallbacks(this)
    }
    override fun onActivityCreated(activity: Activity, savedInstanceState: Bundle?) {
        FabButton.init(activity, savedInstanceState)
    }
// Override other class ... 
}

P.S:  The application class has to override all the interface method of the ActivityLifecycleCallbacks, so as per the standard it would be good to handle by creating a separate handler class and register the same on application class.   For the simple and understanding purpose, I have override all the methods of lifecycle callbacks in application class itself. 

Happy Coding :-) 


Sunday, 19 December 2021

Passing function as a param to collection filter

It's actually simpler to provide a lambda directly, There's other option that's worth covering, too, which is a function / lambda reference.  If you already had a function that would do the job, you don't need to put it in a lambda, but can refer to it directly, through function or its reference using the :: notation. this will works only if the parameter type(s) are compatible, but it's slightly simpler and can generate slightly more efficient bytecode.


val myValues = listOf(12, 25, 215, 3, 52)
println("All Values: $myValues")
println("Even Filter ${myValues.filter { it % 2 == 0 }} -- Simple implicit lambda")
println("Odd Filter ${myValues.filter { oddFilter(it) }} -- lambda reference as param")
println("odd Filter ${myValues.filter(oddFilter)} -- lambda as param to filter function")
println("Even Filter ${myValues.filter(::evenFilter)} -- function reference as param")

val oddFilter = { a: Int -> a % 2 != 0 }

fun evenFilter(g: Int): Boolean = g % 2 == 0

Output:

All Values: [12, 25, 215, 3, 52]
Even Filter [12, 52] -- Simple implicit lambda
Odd Filter [25, 215, 3] -- lambda reference as param
odd Filter [25, 215, 3] -- lambda as param to filter function
Even Filter [12, 52] -- function reference as param

Happy Coding :-)

Saturday, 13 November 2021

Vetoable - Delegates -- Kotlin

Vetoable, this allows us to modify the values when the argument input by the user(s) fulfills the specified condition, it can be used in place of observable properties if the user wants to intercept assignment. Vetoable is like Observable Properties with additional features to allows to modify and notify the values when the condition is met.

Simple example: 

The string which you never want to be reassigned with empty or to some specific text. 

The number values which is assigned should be match some condition.  

The generic observable kind of where the condition check will happen and then the value will be get assigned to the variable, incase if the condition fails, older value will be retained. 

var acceptOnlyEven: Int by Delegates.vetoable(0) { property, prevStr, nextStr ->
        nextStr.mod(2) == 0
}

var allowNonEmptyText: String by Delegates.vetoable("NA") { property, oldValue, newValue ->
        newValue.isNotEmpty()
}

var acceptStatus: String by Delegates.vetoable(STATUS_START) { property, oldValue, newValue ->
        listOf(STATUS_START, STATUS_INPROGRESS, STATUS_DONE).contains(newValue)
}

println("Str: $acceptStatus")
acceptStatus = "Status"
println("Str: $acceptStatus")
acceptStatus = ""
println("Str: $acceptStatus")
acceptStatus = "DonE"
println("Str: $acceptStatus")
acceptStatus = "Done"
println("Str: $acceptStatus")

println("Value: $acceptOnlyEven")
acceptOnlyEven = 10
println("Value: $acceptOnlyEven")
acceptOnlyEven = 5
println("Value: $acceptOnlyEven")

println("Str: $allowNonEmptyText")
allowNonEmptyText = "Status"
println("Str: $allowNonEmptyText")
allowNonEmptyText = ""
println("Str: $allowNonEmptyText")

Output:

Str: Start
Str: Start
Str: Start
Str: Start
Str: Done
Value: 0
Value: 10
Value: 10
Str: NA
Str: Status
Str: Status

Good Luck, Happy Coding :-)

Sunday, 17 October 2021

Kotlin getOrElse & getOrPut

 getOrElse: 

This provides safe access to elements of a collection. It takes an index and a function that provides the default value in cases when the index is out of bound.

getOrPut: 

This returns the value of the key.  If the key is not found in the map, calls the default value function, puts its result into the map under the given key and returns value of the same.

Code Snippet:

    data class Header(val heading: String, val subHeading: String)    

    val items = listOf("AAA", "BBB", "CCC", "DDD")
    val itemMap = mutableMapOf("x" to "AAA", "y" to "BBB")

    val header = listOf(
        Header("Heading1", "SubHeading1"), Header("Heading2", "SubHeading2")
    )

    println("Item at index 2 ${items.getOrElse(2) { "NA" }}")
    println("Item at index 4 ${items.getOrElse(4) { "NA" }}")
    println("Header at index 1 ${header.getOrElse(1) { "NA" }}")
    println("Header at index 2 ${header.getOrElse(2) { "NA" }}")
    
    println("Map Data: $itemMap")
    println("Map Key x ${itemMap.getOrElse("x") { "NA" }}")
    println("Map Key z ${itemMap.getOrElse("z") { "NA" }}")
    
    println("Map Key x ${itemMap.getOrPut("x") { "XXX" }}")
    println("Map Key z ${itemMap.getOrPut("z") { "ZZZ" }}")

    // Remove Map Key "x"
    itemMap.remove("x")

    println("Refreshed Map Data: $itemMap")
    println("Map Key x ${itemMap.getOrPut("x") { "AAA" }}")
    println("Refreshed Map Data: $itemMap")

Output:

Item at index 2 CCC
Item at index 4 NA
Header at index 1 Header(heading=Heading2, subHeading=SubHeading2)
Header at index 2 NA
Map Data: {x=AAA, y=BBB}
Map Key x AAA
Map Key z NA
Map Key x AAA
Map Key z ZZZ
Refreshed Map Data: {y=BBB, z=ZZZ}
Map Key x AAA
Refreshed Map Data: {y=BBB, z=ZZZ, x=AAA}

Happy Coding :-)