Tuesday, 19 April 2016

Encode and Decode the Bitmap to Base64 String and vice versa

// Encode the Bitmap to Base64 String:

 1
 2
 3
 4
 5
 6
 7
 8
 9
10
public static String encodeTobase64(Bitmap image) {
        Bitmap immagex = image;
        ByteArrayOutputStream baos = new ByteArrayOutputStream();
        immagex.compress(Bitmap.CompressFormat.JPEG, 100, baos);
        byte[] b = baos.toByteArray();
        String imageEncoded = Base64.encodeToString(b, Base64.DEFAULT);

        Log.e("LOOK", imageEncoded);
        return imageEncoded;
    }

Decode the Base64 String to Bitmap:

1
2
3
4
public static Bitmap decodeBase64(String input) {
        byte[] decodedByte = Base64.decode(input, 0);
        return BitmapFactory.decodeByteArray(decodedByte, 0, decodedByte.length);
    }
   

Sunday, 17 April 2016

DVM vs ART - Android

There are some major performance improvements that ART brings which were lacking in Dalvik. But every pros have some cons too. I will try to discuss both the advantages and disadvantages here.
Android 4.4 KitKat, Google decided to introduce a new way of executing apps on top of the Android operating system. Let's take a closer look at what this new runtime, called ART
ART is Google's 2-year-long ongoing secret project, which aims to boost the performance of our Android devices.
Android L (5.0) ART has been made as the default runtime (ART has completely replaced Dalvik).
ART (Android RunTime) is the next version of Dalvik. Dalvik is the runtime, bytecode, and VM used by the Android system for running Android applications.
Dalvik is based on JIT (just in time) compilation. It means that each time you run an app, the part of the code required for its execution is going to be translated (compiled) to machine code at that moment. As you progress through the app, additional code is going to be compiled and cached, so that the system can reuse the code while the app is running. Since JIT compiles only a part of the code, it has a smaller memory footprint and uses less physical space on the device.
ART vs Dalvik / AOT vs JIT
Advantages of ART over Dalvik:
  1. The apps launch speed is amazingly fast in case of ART since nothing is compiled at execution.
  2. Boot speed is faster than dalvik since nothing is execued from dalvik partition as in case of odexed ROM in dalvik
  3. Increases battery backup by reducing CPU work due to absence of compilation work on apps execution.
  4. Improved Garbage Collection (GC)
  5. And finally it is a great reward to developers because most of developers are worried that odexed ROMs are faster than deodexed ROMs but they will deodex their ROMs since they heavily theme it. In case of ART whether the ROM is odexed or deodexed it doesn't matter, it compiles the full code into machine language on installation of apps. so even deodexed ROMs are as fast as odexed in ART
Disadvantages of ART
  1. Since ART precompiles apps on installation, it takes 10-20% more space upon installation than dalvik.
  2. As dex bytecodes are converted to native machine code on installation itself, installation takes more time.
Install times on my Nexus 4, for one of our larger projects, jumped from ~17 s to ~25 s.
Dalvik vs. ART Benchmark Results (Android 4.4) : Linpack
Single Thread ---> Dalvik (135) ---> ART(149) ---> 10.93%
Multi- Thread ---> Dalvik (336) ---> ART(383) ---> 13.82%
1) Compilation Approach
This is by far the biggest advantage of ART over Dalvik. The old guy Dalvik used Just-In-Time (JIT) approach in which the compilation was done on demand. All the dex files were converted into their respective native representations only when it was needed.
But ART uses the Ahead-Of-Time (AOT) approach, in which the dex files were compiled before they were demanded. This itself massively improves the performance and battery life of any Android device.
For example
In case of Dalvik, whenever you touch an app icon to open it, the necessary dex files gets converted into their equivalent native codes. The app will only start working when this compilation is done. So, the app is unresponsive until this finishes.
Moreover, this process is repeated every single time you open an app wasting CPU cycles and valuable battery juice.
But in case of ART, whenever you install an app, all the dex files gets converted once and for all. So the installation takes some time and the app takes more space than in Dalvik, but the performance is massively improved and battery life is smartly conserved.

2) Boot Time

In case of Dalvik, the cache is built with time the device runs and apps are used as is indicated by the JIT approach. So the boot time is very fast.
But in case of ART, the cache is built during the first boot, so the boot time is considerably more in case of ART. You might see an "Optimizing apps" dialog box sometimes you boot.

3) Space Usage

The space used by apps being run on ART is much more than that of Dalvik. Like a 20 MB app on Dalvik, takes more than 35 MB on ART.
So if you are on a low storage device, then this can be a huge disadvantage for you.

4) ART is Damn Fast

As discussed above, ART is extremely fast and smooth. Apps are very snappy and responsive. Any comparison between Dalvik and ART, will surely make the ART device win by a significant margin.
ART is the answer to all those who argued that iOS is faster and smoother than Android and is also more battery efficient.

Thanks & Courtesy: 

Sunday, 27 March 2016

How to create android app with movable to sd card feature?


It is very simple to enable move to SD card feature in Android applications, all you need to do is specify the installLocation attribute in Android manifest as ‘auto’.


1
2
3
4
5
6
7
<?xml version="1.0" encoding="utf-8"?>
<manifest xmlns:android="http://schemas.android.com/apk/res/android"
    package="com.prgguru.sdmovable"
    android:versionCode="1"
    android:versionName="1.0" android:installLocation="auto">
...
</manifest>

installLocation attribute can be assigned with following values:

auto
It indicates that your application may be installed on the internal memory (or) external storage, but you don’t have a preference of install location. The system will decide where to install your application based on several factors. The user can also move your application between the two locations.
internalOnly
If you’re certain that your application should never be installed on the external storage, assign installLocation attribute value as ‘internalOnly’.
preferExternal
You request that your application be installed on the external storage, but the system does not guarantee that your application will be installed on the external storage. If the external storage is full, the system will install it on the internal storage. The user can also move your application between the two locations.

Saturday, 12 March 2016

RoundedShape ImageView


In a modern android application, user or profile pictures are shown in a rounded shape and those images filled out with the aspect ratio.

Use the below code to achieve that.

 1
 2
 3
 4
 5
 6
 7
 8
 9
10
11
12
13
14
15
16
17
18
19
20
21
22
public static Bitmap getRoundedShape(Bitmap scaleBitmapImage) {
        int targetWidth = 50;
        int targetHeight = 50;
        Bitmap targetBitmap = Bitmap.createBitmap(targetWidth,
                targetHeight,Bitmap.Config.ARGB_8888);

        Canvas canvas = new Canvas(targetBitmap);
        Path path = new Path();
        path.addCircle(((float) targetWidth - 1) / 2,
                ((float) targetHeight - 1) / 2,
                (Math.min(((float) targetWidth),
                        ((float) targetHeight)) / 2),
                Path.Direction.CCW);

        canvas.clipPath(path);
        Bitmap sourceBitmap = scaleBitmapImage;
        canvas.drawBitmap(sourceBitmap,
                new Rect(0, 0, sourceBitmap.getWidth(),
                        sourceBitmap.getHeight()),
                new Rect(0, 0, targetWidth, targetHeight), null);
        return targetBitmap;
    }

Please refer the link for the Bitmap Image Scaling as to the aspect ratio here,

Done!

Sunday, 14 February 2016

Android Phones – Secret codes

Note: This codes are not founded by me, i have just collected through search and sorted it out.

1. *#*#4636#*#* 
This code can be used to get some interesting information about your phone and battery. It shows following 4 menus on screen:
Phone information
Battery information
Battery history
Usage statistics

2. *#*#7780#*#*
This code can be used for a factory data reset. It’ll remove following things:
Google account settings stored in your phone
System and application data and settings
Downloaded applications
It’ll NOT remove:
Current system software and bundled applications
SD card files e.g. photos, music files, etc.
PS: Once you give this code, you get a prompt screen asking you to click on “Reset phone” button. So you get a chance to cancel your operation.

3. *2767*3855# 
Think before you give this code. This code is used for factory format. It’ll remove all files and settings including the internal memory storage. It’ll also reinstall the phone firmware.
PS: Once you give this code, there is no way to cancel the operation unless you remove the battery
from the phone. So think twice before giving this code.

4. *#*#34971539#*#*
This code is used to get information about phone camera. It shows following 4 menus:
Update camera firmware in image (Don’t try this option)
Update camera firmware in SD card
Get camera firmware version
Get firmware update count
WARNING: Never use the first option otherwise your phone camera will stop working and you’ll need to take your phone to service center to reinstall camera firmware.

5. *#*#7594#*#*
This one is my favorite one. This code can be used to change the “End Call / Power” button action in your phone. Be default, if you long press the button, it shows a screen asking you to select any option from Silent mode, Airplane mode and Power off.You can change this action using this code. You can enable direct power off on this button so you don’t need to waste your time in selecting the option.

6. *#*#197328640#*#*
This code can be used to enter into Service mode. You can run various tests and change settings in the service mode

7. WLAN, GPS and Bluetooth Test Codes:
*#*#232339#*#*  OR
*#*#526#*#* OR
*#*#528#*#* – WLAN test (Use “Menu” button to start various tests)
*#*#232338#*#* – Shows WiFi MAC address
*#*#1472365#*#* – GPS test
*#*#1575#*#* – Another GPS test
*#*#232331#*#* – Bluetooth test
*#*#232337#*# – Shows Bluetooth device address

8. *#*#8255#*#* - This code can be used to launch GTalk Service Monitor.

9. Codes to get Firmware version information:
*#*#4986*2650468#*#* – PDA, Phone, H/W, RFCallDate
*#*#1234#*#* – PDA and Phone
*#*#1111#*#* – FTA SW Version
*#*#2222#*#* – FTA HW Version
*#*#44336#*#* – PDA, Phone, CSC, Build Time, Changelist number

10. Codes to launch various Factory Tests:
*#*#0283#*#* – Packet Loopback
*#*#0*#*#* – LCD test
*#*#0673#*#* OR *#*#0289#*#* – Melody test
*#*#0842#*#* – Device test (Vibration test and BackLight test)
*#*#2663#*#* – Touch screen version
*#*#2664#*#* – Touch screen test
*#*#0588#*#* – Proximity sensor test
*#*#3264#*#* – RAM version

11. To get to a File copy screen for backing up your images, videos, voice memos, and other media
files, type in *#*#273283*255*663282*#*#*

12. If you want to change default actions for the End Call and Power button, punch in *#*#7594#*#* 
and change those settings.

13. Android also supports the Service Mode, invoked with the *#*#197328640#*#*code, that lets
you run tests related to the WiFi, Bluetooth, and GPS circuitry.
      Other factory tests include LCD - *#*#0*#*#*,
      Vibration and backlight - *#*#0842#*#*,
      Touchscreen - *#*#2664#*#*,
      RAM - *#*#3264#*#*,
      proximity sensor - *#*#0588#*#*.

14. Voice Dialer Logging Enabled - *#*#8351#*#*
15. PUK Unlock (from emergency dial screen)
**05*<PUK Code>*<enter a new pin>*<confirm the new pin>#

Courtesy: http://www.technotalkative.com/android-secret-codes/

Sunday, 24 January 2016

Java Quick Reference - Tyro

This post will briefly gives you an idea about important Java syntax on one page to get you up to speed quickly, including:

Class Implementation:

public class MyClass {                                              
public String mString; 
private int mInt; 
// More member variables 
// Constructor for Class 
public MyClass() {
 mString = Foo; mInt = 10; }
 // More meth
 }                                                               
}

Declaring Variables:
double doubleVar = 1.0 
doubleVar = 2.0f
int intVar = 1; 
String stringVar = “Hey”; 
Boolean truth = true;

Sample Values:
int: 1, 2, 500, 10000 
double: 1.5, 3.14, 578.234 
boolean: true, false 
String: “Kermit”, “Gonzo”, “Ms. Piggy”                              
ClassName: Activity, TextView, etc

Sunday, 17 January 2016

IoT Internet of Things

The “Internet of things” (IoT) is becoming an increasingly growing topic of conversation both in the workplace and outside of it. It’s a concept that not only has the potential to impact how we live but also how we work. But what exactly is the “Internet of things” and what impact is it going to have on you, if any? There are a lot of complexities around the “Internet of things” but I want to stick to the basics. Lots of technical and policy-related conversations are being had but many people are still just trying to grasp the foundation of what the heck these conversations are about.
Let’s start with understanding a few things.

Broadband Internet is become more widely available, the cost of connecting is decreasing, more devices are being created with Wi-Fi capabilities and sensors built into them, technology costs are going down, and smartphone penetration is sky-rocketing.  All of these things are creating a “perfect storm” for the IoT. 

So What Is The Internet Of Things?

Simply put, this is the concept of basically connecting any device with an on and off switch to the Internet (and/or to each other). This includes everything from cellphones, coffee makers, washing machines, headphones, lamps, wearable devices and almost anything else you can think of.  This also applies to components of machines, for example a jet engine of an airplane or the drill of an oil rig. As I mentioned, if it has an on and off switch then chances are it can be a part of the IoT.  The analyst firm Gartner says that by 2020 there will be over 26 billion connected devices… That’s a lot of connections (some even estimate this number to be much higher, over 100 billion).  The IoT is a giant network of connected “things” (which also includes people).  The relationship will be between people-people, people-things, and things-things.

How Does This Impact You?

The new rule for the future is going to be, “Anything that can be connected, will be connected.” But why on earth would you want so many connected devices talking to each other? There are many examples for what this might look like or what the potential value might be. Say for example you are on your way to a meeting; your car could have access to your calendar and already know the best route to take. If the traffic is heavy your car might send a text to the other party notifying them that you will be late. What if your alarm clock wakes up you at 6 a.m. and then notifies your coffee maker to start brewing coffee for you? What if your office equipment knew when it was running low on supplies and automatically re-ordered more?  What if the wearable device you used in the workplace could tell you when and where you were most active and productive and shared that information with other devices that you used while working?

On a broader scale, the IoT can be applied to things like transportation networks: “smart cities” which can help us reduce waste and improve efficiency for things such as energy use; this helping us understand and improve how we work and live. Take a look at the visual below to see what something like that can look like.


The reality is that the IoT allows for virtually endless opportunities and connections to take place, many of which we can’t even think of or fully understand the impact of today. It’s not hard to see how and why the IoT is such a hot topic today; it certainly opens the door to a lot of opportunities but also to many challenges. Security is a big issue that is oftentimes brought up. With billions of devices being connected together, what can people do to make sure that their information stays secure? Will someone be able to hack into your toaster and thereby get access to your entire network? The IoT also opens up companies all over the world to more security threats. Then we have the issue of privacy and data sharing. This is a hot-button topic even today, so one can only imagine how the conversation and concerns will escalate when we are talking about many billions of devices being connected. Another issue that many companies specifically are going to be faced with is around the massive amounts of data that all of these devices are going to produce. Companies need to figure out a way to store, track, analyze and make sense of the vast amounts of data that will be generated.

So what now?

Conversations about the IoT are (and have been for several years) taking place all over the world as we seek to understand how this will impact our lives. We are also trying to understand what the many opportunities and challenges are going to be as more and more devices start to join the IoT. For now the best thing that we can do is educate ourselves about what the IoT is and the potential impacts that can be seen on how we work and live.

Wednesday, 28 October 2015

Applying User-defined Font Type in Android


                                                      (Before Applying the Font type)

This post helps the Tyro’s who are trying to apply their user-defined font type or face to their android views i.e. (TextView, Button, EditText etc…) in android there are only four basic predefined fonts type are available to design but in order to design our rich UI we are suppose to go with our own font face (.ttf) so first we need to copy our font type file (.ttf) in to our assets folder showed in Package Explorer and use the code highlighted in the GodTest.java file


                                                  (After Applying the Font Face)

Sunday, 20 September 2015

Get Android Device UDID


Get Your Android Device UDID:

1
2
3
public static String getDeviceUDID(Context ctx) {
return Secure.getString(ctx.getContentResolver(),Secure.ANDROID_ID);
}

Tuesday, 25 August 2015

How to learn Android App development in 30 days?


You need to study core Java before starting to enter into the android platform.

Try to learn core Java by 5 days

Once you learned Code java

Try the below link and learn it by 5 days
In this link they have explained about android development from the very basic things.

They have many tutorial application with perfect explanation. And it will be easy to understand.

Try below link and learn it by 5 days
This blog will be useful to learn material designs and advanced technologies like chat application to do web service etc..

To know about all android application development and android versions update see the below link
Study and workout the below mentioned widgets by 10 days
  1. Should know completely about RelativeLayout, LinearLayout and should know where to use it.
  2. RecyclerView (For list and grid).
  3. Fragment.
  4. Navigation Drawer, and TabLayout.
  5. Database (Sqlite, Try to use third party libraries ex. Realm).
  6. Retrofit, Volley, Picasso, Glide, ,Fresco, Butterknife.
  7. Material Designs.
  8. Google maps.
  9. Thread, Handler, Asynchronous task.
  10. FrameLayout, Table Layout.
  11. Intent, Types of Intent.
  12. Broadcast Receiver, Service, Content Provider
  13. Gradle.
That’s it, you can learn Android with in 25 days.

Thanks :)

Sunday, 21 June 2015

Drawable to Bitmap using Android


Convert Drawable to Bitmap:

1
Bitmap bitmap= BitmapFactory.decodeResource(getResources(),  R.drawable.image);

Tuesday, 19 May 2015

Displaying Bitmaps Efficiently and Avoiding java.lang.OutofMemoryError

java.lang.OutofMemoryError: bitmap size exceeds VM budget. This is most common error for us when we are decoding Bitmap more than 4 MB. In generally before decoding bitmap we do not know how much bigger the size of a bitmap will be. So its very difficult problem for us to handle this error in proactive approach But good thing is that android provide a way to handle this problem.Before decoding bitmap we just decode it with options.inJustDecodeBounds = true. options is the instance of BitmapFactory. 
It does not load bitmap into memory but it help us to find the width and height of a bitmap so that we can reduce the height and width according to our device

As Bitmaps take up a lot of memory, especially for rich images like photographs. For example, the camera on the Galaxy Nexus takes photos up to 2592x1936 pixels (5 megapixels). If the bitmap configuration used is ARGB_8888 (the default from the Android 2.3 onward) then loading this image into memory takes about 19MB of memory (2592*1936*4 bytes), immediately exhausting the per-app limit on some devices.

So we will find actual height and width of a bitmap as follows...

 1
 2
 3
 4
 5
 6
 7
 8
 9
10
11
12
13
14
15
16
17
18
19
20
21
22
23
24
25
BitmapFactory.Options options = new BitmapFactory.Options();
options.inJustDecodeBounds = true;
BitmapFactory.decodeResource(getResources(), R.id.myimage, options);
int imageHeight = options.outHeight;
int imageWidth = options.outWidth;
String imageType = options.outMimeType;

Now scale down the bitmap and load into memory.I use decodeResource() method here but you can use any method(decodeFile etc).So now using following function scale down bitmap

public static int calculateInSampleSize(
            BitmapFactory.Options options, int reqWidth, int reqHeight) {
    // Raw height and width of image
    final int height = options.outHeight;
    final int width = options.outWidth;
    int inSampleSize = 1;

    if (height > reqHeight || width > reqWidth) {
        if (width > height) {
            inSampleSize = Math.round((float)height / (float)reqHeight);
        } else {
            inSampleSize = Math.round((float)width / (float)reqWidth);
        }
    }
    return inSampleSize;
}

Here inSampleSize will reduce the size and memory size of an Bitmap.To use this method, first decode withinJustDecodeBounds set to true, pass the options through and then decode again using the newinSampleSize value and inJustDecodeBounds set to false.


 1
 2
 3
 4
 5
 6
 7
 8
 9
10
11
12
13
14
15
public static Bitmap decodeSampledBitmapFromResource(Resources res, int resId,
        int reqWidth, int reqHeight) {

    // First decode with inJustDecodeBounds=true to check dimensions
    final BitmapFactory.Options options = new BitmapFactory.Options();
    options.inJustDecodeBounds = true;
    BitmapFactory.decodeResource(res, resId, options);

    // Calculate inSampleSize
    options.inSampleSize = calculateInSampleSize(options, reqWidth, reqHeight);

    // Decode bitmap with inSampleSize set
    options.inJustDecodeBounds = false;
    return BitmapFactory.decodeResource(res, resId, options);
}

Memory over flow error is gone…….

Sunday, 17 May 2015

Make your android TextView Scrollable

In XML Design: - TextView
1
android:scrollbars="vertical"
In Java Code: - TextView 
1
txtScroll.setMovementMethod(new ScrollingMovementMethod());

Tuesday, 10 February 2015

How to create the Customized Splash Screen in Android


1.      Create a customized splash screen layout

      a.       Layout having the TextView with the splash screen title
      b.      ImageView having the Loading image


 1
 2
 3
 4
 5
 6
 7
 8
 9
10
11
12
13
14
15
16
17
18
19
20
21
22
23
24
25
Layout : main.xml
<? xml version="1.0" encoding="utf-8"?>
<LinearLayout xmlns:android="http://schemas.android.com/apk/res/android"
    android:orientation="vertical"
    android:layout_width="fill_parent"
    android:background="#fff"
    android:gravity="center"
    android:layout_height="fill_parent">
   
 <TextView
android:id="@+id/Title"
               android:layout_width="wrap_content"
               android:layout_height="wrap_content"
               android:padding="10dp"
               android:textSize="30sp"
               android:textColor="#cd6000"
               android:textStyle="bold"
               android:text="My Splash Page" />
              
 <ImageView
android:id="@+id/Loading"
               android:layout_width="wrap_content"
               android:layout_height="wrap_content"
               android:src="@drawable/loading" />
</LinearLayout>

2.      Create a rotate.xml in a drawable folder for need of  loading animation

<?xml version="1.0" encoding="UTF-8"?>
<rotate
    xmlns:android="http://schemas.android.com/apk/res/android"
    android:fromDegrees="0"
    android:toDegrees="360"
    android:pivotX="50%"
    android:pivotY="50%"
    android:repeatCount="infinite"
    android:interpolator="@android:anim/linear_interpolator"   
    android:duration="1000" />

3.      Source SplashScreen.java

       a.  Referencing the xml widgets in to code.
 b.  Create a Animation and start load the animation to the ImageView.
       c.     Using the handler class and runnable thread make postdelay for 1000 milliseconds   and clear the animation then start the second activity.


 1
 2
 3
 4
 5
 6
 7
 8
 9
10
11
12
13
14
15
16
17
18
19
20
21
22
23
24
25
26
27
28
29
30
31
32
33
34
35
36
37
38
39
40
41
42
43
44
45
46
47
48
49
50
51
52
53
54
55
56
57
package com.app;

import android.app.Activity;
import android.content.Intent;
import android.os.Bundle;
import android.os.Handler;
import android.view.animation.Animation;
import android.view.animation.AnimationUtils;
import android.widget.ImageView;
import android.widget.TextView;

/**
 * @author Rajendhiran. E
 * Feb 10, 2013 11:10:52 PM
 */

public class SplashScreen extends Activity
{
   TextView Title;
   ImageView Loading;
   Animation anim;
   Handler h;
  
   protected void onCreate(Bundle savedInstanceState)
   {    
         super.onCreate(savedInstanceState);
         setContentView(R.layout.main);
         init();
         process();
   }
  
/* @author Rajendhiran. E, Feb 10, 2013 11:14:24 PM  */ 

   private void init()
   {
         Title = (TextView) findViewById(R.id.Title);
         Loading = (ImageView) findViewById(R.id.Loading);
         anim = AnimationUtils.loadAnimation(SplashScreen.this, 
R.drawable.rotate);
         Loading.startAnimation(anim);
         h = new Handler();
   }    

   /* @author Rajendhiran. E, Feb 10, 2013 11:19:35 PM */        
   private void process()
   {
         h.postDelayed(new  Runnable()
         {
               public void run()
               {                      
                     Loading.clearAnimation();
                     finish();
startActivity(new Intent(SplashScreen.this,SecondActivity.class));
               }
         }, 1000);        
   }    
}
Source Code: SplashScreen.zip

Tuesday, 3 February 2015

Customized Count down timer


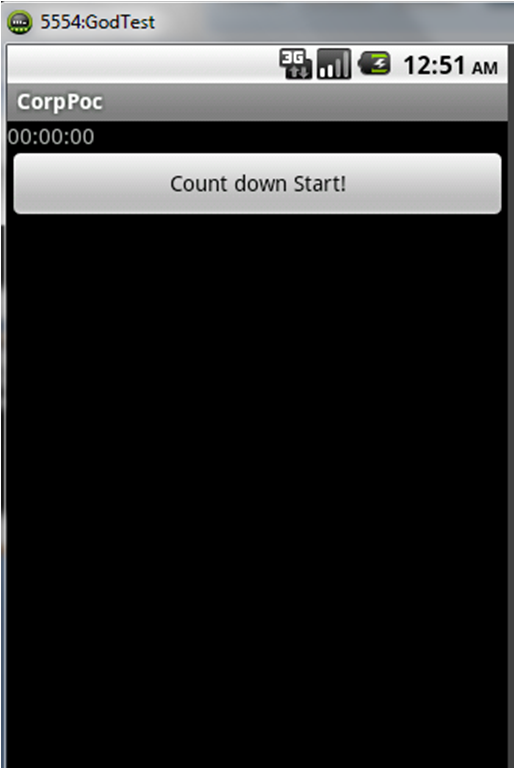
      CountDownTimer is a predefined class, which help us in the timer related activities, such as showing up the  reducing of time seconds, that we have seen while playing games or doing some timer related stuffs to our apps etc… its easy to develop just passing the milliseconds as parameters and it throws as our customized output as (HH:MM:SS) etc… 

1.     Design a layout with a counter start Button and TextView to display the time

1:  <?xml version="1.0" encoding="utf-8"?>  
2:  <LinearLayout xmlns:android="http://schemas.android.com/apk/res/android"  
3:    android:orientation="vertical"  
4:    android:layout_width="fill_parent"  
5:    android:layout_height="fill_parent"  
6:    >  
7:  <TextView   
8:    android:id="@+id/countdown"  
9:    android:layout_width="fill_parent"   
10:    android:layout_height="wrap_content"   
11:    android:text="00:00:00"  
12:    />  
13:   <Button  
14:     android:id="@+id/TimeBtn"  
15:     android:layout_width="fill_parent"  
16:     android:layout_height="wrap_content"  
17:     android:text="Count down Start!" />  
18:  </LinearLayout>  

2.      POCApp.java with counter down timer

1:  package com.app.poc;  
2:  import java.text.SimpleDateFormat;  
3:  import java.util.TimeZone;  
4:  import android.app.Activity;  
5:  import android.os.Bundle;  
6:  import android.os.CountDownTimer;  
7:  import android.util.Log;  
8:  import android.view.View;  
9:  import android.widget.Button;  
10:  import android.widget.TextView;  
11:  public class POCApp extends Activity   
12:  {  
13:    public Button TimeBtn;  
14:    public TextView Time;  
15:    MyCounter timer;  
16:    public void onCreate(Bundle savedInstanceState)   
17:    public void onCreate(Bundle savedInstanceState)   
18:    {  
19:      super.onCreate(savedInstanceState);  
20:      setContentView(R.layout.main);  
21:      init();  
22:      process();  
23:    }  
24:    private void process()   
25:    {  
26:      TimeBtn.setOnClickListener(new View.OnClickListener()  
27:      {  
28:        public void onClick(View arg0)   
29:        {      
30:          if(timer!=null)  
31:           timer.cancel();  
32:          timer = new MyCounter(3800*1000,1000);  
33:          timer.start();                          
34:          //Toast.makeText(POCApp.this, disHour+":"+disMinu+":"+disSec, Toast.LENGTH_LONG).show();  
35:        }  
36:      });  
37:    }  
38:    /**  
39:     *  @author Rajendhiran. E  
40:     *  Jan 16, 20134:46:24 PM  
41:     */  
42:    private void init()   
43:    {  
44:    TimeBtn = (Button) findViewById(R.id.TimeBtn);  
45:      Time = (TextView) findViewById(R.id.countdown);  
46:    }  
47:    /**  
48:     *  @author Rajendhiran. E  
49:     *  Jan 16, 20134:46:25 PM  
50:     */  
51:    class MyCounter extends CountDownTimer  
52:    {  
53:      SimpleDateFormat mSimpleDateFormat;  
54:      public MyCounter(long millisInFuture, long countDownInterval)   
55:      {  
56:        super(millisInFuture, countDownInterval);  
57:        mSimpleDateFormat= new SimpleDateFormat("HH:mm:ss");  
58:        mSimpleDateFormat.setTimeZone(TimeZone.getTimeZone("UTC"));  
59:      }  
60:      @Override  
61:      public void onFinish()   
62:      {  
63:       Log.d("Timer Completed: ","Completed!");  
64:        Time.setText("00:00:00");        
65:      }  
66:      @Override  
67:      public void onTick(long millisUntilFinished)  
68:      {  
69:       Time.setText(mSimpleDateFormat.format(millisUntilFinished));      
70:      }  
71:     }