Thursday 25 August 2016

To Enable the Simple Date Picker when Click the Text Field - PHP ( Yii Frameworks )

Its Simple way to enable the Datepicker when Click the text field in PHP Yii Frameworks.

Step 1 - Install the Datepicker widget to the yii-2 with the help of procedures in the following link.
              https://github.com/2amigos/yii2-date-picker-widget

Step 2 - Remove the Textfield code from the form.php
             <?= $form->field($model, 'date')->textInput(['maxlength' => true]) ?>

Step 3 - Replace the textfield code by the follwing

   <?= $form->field($model, 'date')->widget
   ( DatePicker::className(), 
     [  // inline too, not bad
        'inline' => false, 
        // modify template for custom rendering
        'clientOptions' => 
        [ 'autoclose' => true,
         'format' => 'dd-M-yyyy']
      ] );
    ?>

Step 4 - Have to access the Datepicker at the beginning , just copy the following and paste it.
              use dosamigos\datepicker\DatePicker ;

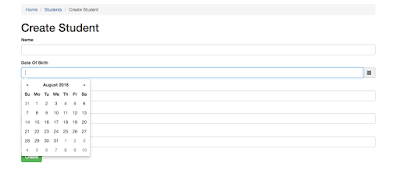
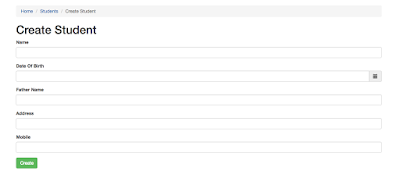
Output -

Before Clicking the text field
After Clicking the text field


Thursday 18 August 2016

Auto-Zooming the Image and Fit to the screen in UICollectionView - iOS Swift

Click the Image once to Zoom the Image and Fit it to the Screen in UICollectionView . Its the Simple procedure that we have to alter the size of the UIImage when it is Tapped.

You Just need to copy the code and paste it in your program.

//1
var largePhotoIndexPath : NSIndexPath? {
didSet {
  //2
  var indexPaths = [NSIndexPath]()
  if largePhotoIndexPath != nil {
    indexPaths.append(largePhotoIndexPath!)
  }
  if oldValue != nil {
    indexPaths.append(oldValue!)
  }
  //3
      collectionView?.performBatchUpdates({
        self.collectionView?.reloadItemsAtIndexPaths(indexPaths)
        return
        }){
          completed in
          //4
          if self.largePhotoIndexPath != nil {
            self.collectionView?.scrollToItemAtIndexPath(
              self.largePhotoIndexPath!,
              atScrollPosition: .CenteredVertically,
              animated: true)
          }
      }
  }
}

func collectionView(collectionView: UICollectionView,
  layout collectionViewLayout: UICollectionViewLayout,
  sizeForItemAtIndexPath indexPath: NSIndexPath) -> CGSize {
 
  let Photo = photoForIndexPath(indexPath)
 
  // New code
  if indexPath == largePhotoIndexPath {
    var size = collectionView.bounds.size
    size.height -= topLayoutGuide.length
    size.height -= (sectionInsets.top + sectionInsets.right)
    size.width -= (sectionInsets.left + sectionInsets.right)
    return Photo.sizeToFillWidthOfSize(size)
  }
  // Previous code
  if var size = Photo.thumbnail?.size {
    size.width += 10
    size.height += 10
    return size
  }
  return CGSize(width: 100, height: 100)
}

extension ViewController : UICollectionViewDelegate {
 
  override func collectionView(collectionView: UICollectionView,
    shouldSelectItemAtIndexPath indexPath: NSIndexPath) -> Bool {
      if largePhotoIndexPath == indexPath {
        largePhotoIndexPath = nil
      }
      else {
        largePhotoIndexPath = indexPath
      }
      return false
  }
}

override func collectionView(collectionView: UICollectionView, cellForItemAtIndexPath indexPath: NSIndexPath) -> UICollectionViewCell {
 
  let cell = collectionView.dequeueReusableCellWithReuseIdentifier(
    reuseIdentifier, forIndexPath: indexPath) as! yourCellName
  let Photo = photoForIndexPath(indexPath)
 
  //1
  cell.activityIndicator.stopAnimating()
 
  //2
  if indexPath != largePhotoIndexPath {
    cell.imageView.image = Photo.thumbnail
    return cell
  }
 
  //3
  if Photo.largeImage != nil {
    cell.imageView.image = Photo.largeImage
    return cell
  }
 
  //4
  cell.imageView.image = Photo.thumbnail
  cell.activityIndicator.startAnimating()
 
  //5
  Photo.loadLargeImage {
    loadedPhoto, error in
 
    //6
    cell.activityIndicator.stopAnimating()
 
    //7
    if error != nil {
      return
    }
 
    if loadedPhoto.largeImage == nil {
      return
    }
 
    //8
    if indexPath == self.largePhotoIndexPath {
      if let cell = collectionView.cellForItemAtIndexPath(indexPath) as? yourCellName {
        cell.imageView.image = loadedPhoto.largeImage
      }
    }
  }
 
  return cell
}

Here the Name "Photo" stands for the name of the UIImage and "yourCellName" stands for the name of the UICollectionViewCell.

Outputs:

                 Before Click                                                       After Click


Wednesday 3 August 2016

MKMapView for required location using Latitude and Longitude - iOS Swift

This Code will be really useful to find the location of the required place. We need to give latitude and longitude as Input .

For example :
     
      Here I want to Find the location of S2 Theatre, Thiruvanmiyur, Chennai . So, First I want to collect the latitude and longitude of the location.
                                   Latitude    =  12.9895  Longitude = 80.2565
Step 1 :
               Insert a Mapview in Main storyboard and also Create an IBOutlet for MKMapView in View Controller.
Step 2 :
               Copy this code into the viewDidLoad. Inside the variable location you have to include the latitude and longitude. Inside the variable span you have to include the zooming size that which required. Annotation is nothing but the marker present in the location.

        let location = CLLocationCoordinate2DMake(12.9895, 80.2565) 
        let span = MKCoordinateSpanMake(0.0002, 0.0002)
    
        let region = MKCoordinateRegion(center: location,span: span)
    
        mapView.setRegion(region, animated: true)
        
        let annotation = MKPointAnnotation()
        annotation.coordinate = location
        annotation.title = "S2 Theatre"
        
        mapView.addAnnotation(annotation)


Output :
                                        

Tuesday 2 August 2016

Add button to the UIToolbar - iOS Swift

This code will really helpful to add button to the UIToolbar present in keyboard or pickerview.

For example:
If you want "Done" button to be inserted in the toolbar of the pickerview. you just have to follow simple steps as follows.

Step 1:
Have to include this code inside "viewDidLoad" to create "Done" button in UIToolbar. "textBoxText" is the name of the Text field.

      
        // create done button in toolbar.
        doneToolbar = UIToolbar(frame: CGRectMake(0, 0, self.view.frame.size.width, 50))
        doneToolbar.barStyle = UIBarStyle.Default
        doneToolbar.items =   [UIBarButtonItem(title: "Done", style: UIBarButtonItemStyle.Plain, target: self, action: #selector(FirstViewController.PickerDoneButtonTapped))]
        doneToolbar.sizeToFit()
        textBoxText.inputAccessoryView = doneToolbar


Step 2:
Code the function of "Done" button that has included in the UIToolbar. I have given that if  "Done" button is tapped the PickerView have to disable.

    func PickerDoneButtonTapped()
    {
        textBoxText.resignFirstResponder()
    }

Step 3:
Have to call the function in "viewDidload"

self.PickerDoneButtonTapped()

Output: