Sunday 11 December 2016

Code Quality Measurement - Comics


It’s not that much easy to measure the code quality???? 
Because the best part of programming lays at all the edges of the sphere, so first we need to find those edges of the sphere…  !@#!@%

Quality has been determined only based on low rate in the 
No. of WTFs/Minute…. 


This can be resolved by following some basic standards and there are some code analysis tools help us lot on this


Sunday 4 December 2016

Navigation Controller using Storyboard - iOS Swift

This code will be really useful to you to change the view controller using Storyboard ID.

For example -
There were 2 view Controllers named FirstViewController and SecondViewController respectively.
If you want to move from FirstViewController to SecondViewController there is a simple Code using Storyboard  ID.

Step 1 :-

Enter the StoryBoard ID for both the ViewControllers
 

Step 2 :-

Write a code in FirstViewController.
//to navigate to the next view controller with the help of storyboard
let secondVC =  self.storyboard?.instantiateViewControllerWithIdentifier("SecondViewController") as! SecondViewController
self.navigationController?.pushViewController(secondVC, animated: true)

Sunday 20 November 2016

Barcode and QR Scanner - Android

MaterialBarcodeScanner: Easy to use barcode reader for your Android Project (Uses Google Mobile Vision API).

Overview
 - Integrate in a few minutes
 - Quick and simple api
 - No external apps required
 - Uses Google Mobile Vision API (fast, local and rotation free)
 - Automatically parses QR Codes, Data Matrix, PDF-417, and Aztec values
 - Supports 1D barcodes: EAN-13, EAN-8, UPC-A, UPC-E, Code-39, Code-93, Code-128, ITF,
   Codabar
 - Supports 2D barcodes: QR Code, Data Matrix, PDF-417, Aztec

Setup:

0. Provide gradle dependency
    compile 'com.edwardvanraak:MaterialBarcodeScanner:0.0.6-ALPHA'

1. Build a MaterialBarcodeScanner
    private void startScan() {
        /**
         * Build a new MaterialBarcodeScanner
         */
        final MaterialBarcodeScanner mBarcodeScanner 
                 = new MaterialBarcodeScannerBuilder()
                .withActivity(MainActivity.this)
                .withEnableAutoFocus(true)
                .withBleepEnabled(true)
                .withBackfacingCamera()
                .withText("Scanning...")
                .withResultListener(new MaterialBarcodeScanner.OnResultListener() {
                    @Override
                    public void onResult(Barcode barcode) {
                        barcodeResult = barcode;
                        result.setText(barcode.rawValue);
                    }
                })
                .build();
        mBarcodeScanner.startScan();
    }

2. Hook it up to a button
    fab.setOnClickListener(new View.OnClickListener() {
            @Override
            public void onClick(View view) {
                startScan();
            }
        });

3. Start scanning!

Additional Setup

Center tracking mode
By default a barcode is tracked/highlighted at the location at which it was found.  With center tracking mode a square image will be shown during scanning that will turn green when a barcode is found. Please note that you can still scan a barcode outside the center tracker! This is purely a visual change.

To activate center tracking mode simply call the following builder method:
.withCenterTracker()

If you want to provide your own image for the tracker you can use:
.withCenterTracker(R.drawable.your_tracker_image,R.drawable.your_detected_state_tracker_image)

Exclusive barcode scanning
In some situations you might want to scan for only a certain type of barcode like QR-Codes or 2D barcodes. You can do this with the following builder methods:
.withOnlyQRCodeScanning()
.withOnly3DScanning()
.withOnly2DScanning()
If you want to scan for a very specific combination of barcodes you can setup the builder like this:
.withBarcodeFormats(Barcode.AZTEC | Barcode.EAN_13 | Barcode.CODE_93)

*Check out the full example project for code required for camera permissions on Android 6.0 Marshmallow

Sunday 6 November 2016

PARCELABLE VS JAVA SERIALIZATION JAVA / ANDROID

Android developers often face a predicament while passing object references to activities of whether to go with the Java Serialization method or opt for Android Parcelable. This blog is my attempt to compare the two techniques and cite an example to help decide which one of these is the best approach for passing an object from one activity to another.

Passing primitive data types like string, integer, float, etc. through intents is quite easy in Android. All you have to do is put the data with unique key in intents and send it to another activity. If a user wants to send Java objects through intent, Java class should be implemented using the Parcelable interface. Serialization, on the other hand, is a Java interface that allows users to implement the interface which gets marked as Serializable.

During the Android application development process, developers often have to send Java class objects from one activity to another activity using the intent. Developers can opt from the two types of object passing techniques, i.e. Serialization and Parcelable of object.  The fact that Parcelable is faster than Serialization makes it a preferred choice of approach while passing an object. Here’s why:

Implementation:
Android Parcelable implementation allows objects to read and write from Parcels which can contain flattened data inside message containers.  If a developer wants to convert a Java object into Parcelable, then the best way to do so is by implementing the Parcelable interface and overriding the writeToParcel() methods in its own class. The first step is to override the writeToParcel() method and  write all object members into parcel objects. The second is to create a static Parcelable.Creator object to de-serialize the Java object.

Differences between Serialization and Parcelable:
Parcelable and Serialization are used for marshaling and unmarshaling Java objects.  Differences between the two are often cited around implementation techniques and performance results. From my experience, I have come to identify the following differences in both the approaches:
  • Parcelable is well documented in the Android SDK; serialization on the other hand is available in Java. It is for this very reason that Android developers prefer Parcelable over the Serialization technique.
  • In Parcelable, developers write custom code for marshaling and unmarshaling so it creates less garbage objects in comparison to Serialization. The performance of Parcelable over Serialization dramatically improves (around two times faster), because of this custom implementation.
  • Serialization is a marker interface, which implies the user cannot marshal the data according to their requirements. In Serialization, a marshaling operation is performed on a Java Virtual Machine (JVM) using the Java reflection API. This helps identify the Java objects member and behavior, but also ends up creating a lot of garbage objects. Due to this, the Serialization process is slow in comparison to Parcelable.

Sunday 23 October 2016

Difference between GET and POST methods


  • Fundamental Difference is probably the Visibility - GET request is sent via the URL string (appended to the URI with a question-mark as separator), which is visible whereas POST request is encapsulated in the body of the HTTP request and can't be seen.

  • Length - Since, GET request goes via URL, so it has a limitation for its length. It can't be more than 255 characters long (though this is browser dependent, but usually the max is 255 characters only). Whereas no such maximum length limitation holds for the POST request for the obvious reason that it becomes a part of the body of the HTTP request and there is no size limitation for the body of an HTTP request/response.

  • Performance - GET request is comparatively faster as it's relatively simpler to create a GET request and the time spent in the encapsulation of the POST request in the HTTP body is saved in this case. In addition, the maximum length restriction facilitates better optimization of GET implementation.

  • Type of Data - GET request is sent via URL string and as we all know that URL can be text-only, so GET can carry only text data whereas POST has no such restriction and it can carry both text as well as binary data.

  • Caching/Bookmarking - again for the obvious reason that a GET request is nothing but an URL hence it can be cached as well as Bookmarked. No such luxuries with a POST request.

  • FORM Default - GET is the default method of the HTML FORM element. To submit a FORM using POST method, we need to specify the method attribute and give it the value "POST".

  • Data Set - GET requests are restricted to use ASCII characters only whereas POST requests can use the 'enctype' attribute with a value "multipart/form-data" to use the Universal Multiple-Octet Coded Character Set (UCS).

Sunday 25 September 2016

Html tags in TextView - Android

The best approach to use CData sections for the string in strings.xml file to get a actual display of the html content to the TextView the below code snippet will give you the fair idea.

//in string.xml file
<string name="welcome_text"><![CDATA[<b>Welcome,</b> to the forthetyroprogrammers blog Logged in as:]]> %1$s.</string>

Now in Java code you can assign like this,

//and in Java code
String welcomStr=String.format(getString(R.string.welcome_text),username);
tvWelcomeUser.setText(Html.fromHtml(welcomStr));

CData section in string text keeps the html tag data intact even after formatting text using String.format method. So, Html.fromHtml(str) works fine and you’ll see the bold text in Welcome message.

Output:
Welcome, to your favorite music app store. Logged in as: <username>

Java - String, StringBuilder & String Buffer


Below is the main difference between these three most commonly used classes.


  • String class objects are immutable whereas StringBuffer and StringBuilder objects are mutable.
  • StringBuffer is synchronized while StringBuilder is not synchronized.
  • Concatenation operator "+" is internal implemented using either StringBuffer or StringBuilder.
Criteria to choose among StringStringBuffer and StringBuilder
  • If the Object value is not going to change use String Class because a String object is immutable.
  • If the Object value can change and will only be accessed from a single thread, use a StringBuilder because StringBuilder is not synchronized one.
  • In case the Object value can change, and will be modified by multiple threads, use a StringBuffer because StringBuffer is synchronized.
The main idea is that String is immutable. So when you are trying to modify it, new object created. StringBuffer and StringBuilder are mutable. And the difference is the first one is thread-safe.
The common approach to using StringBuilder is to parse something when you iteratively create a String object in a NON thread safe environment.
For example, you have a numbers array [1, 2, 3]. To create object "String1String2String3" you can use a StringBuilder
StringBuilder builder = new StringBuilder();
foreach(Integer num : array) {
    builder.append("String").append(num);
}
builder.toString();
It's better than just using String string = string + ("String" + num);. AFAIK, compiler will optimize using string concatenation in the loop to StringBuilder, but better to use it manually.
StringBuffer is used when you have shared states, that are modified by concurrent threads.
Courtesy & Source:
http://stackoverflow.com/a/11273836
http://stackoverflow.com/a/11273893

Thursday 25 August 2016

To Enable the Simple Date Picker when Click the Text Field - PHP ( Yii Frameworks )

Its Simple way to enable the Datepicker when Click the text field in PHP Yii Frameworks.

Step 1 - Install the Datepicker widget to the yii-2 with the help of procedures in the following link.
              https://github.com/2amigos/yii2-date-picker-widget

Step 2 - Remove the Textfield code from the form.php
             <?= $form->field($model, 'date')->textInput(['maxlength' => true]) ?>

Step 3 - Replace the textfield code by the follwing

   <?= $form->field($model, 'date')->widget
   ( DatePicker::className(), 
     [  // inline too, not bad
        'inline' => false, 
        // modify template for custom rendering
        'clientOptions' => 
        [ 'autoclose' => true,
         'format' => 'dd-M-yyyy']
      ] );
    ?>

Step 4 - Have to access the Datepicker at the beginning , just copy the following and paste it.
              use dosamigos\datepicker\DatePicker ;

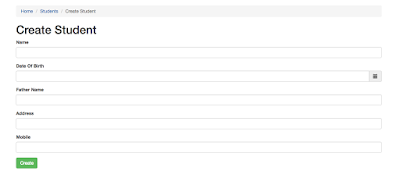
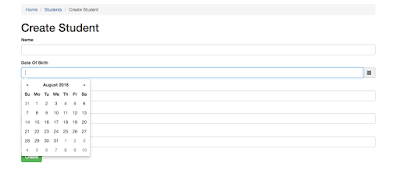
Output -

Before Clicking the text field
After Clicking the text field


Thursday 18 August 2016

Auto-Zooming the Image and Fit to the screen in UICollectionView - iOS Swift

Click the Image once to Zoom the Image and Fit it to the Screen in UICollectionView . Its the Simple procedure that we have to alter the size of the UIImage when it is Tapped.

You Just need to copy the code and paste it in your program.

//1
var largePhotoIndexPath : NSIndexPath? {
didSet {
  //2
  var indexPaths = [NSIndexPath]()
  if largePhotoIndexPath != nil {
    indexPaths.append(largePhotoIndexPath!)
  }
  if oldValue != nil {
    indexPaths.append(oldValue!)
  }
  //3
      collectionView?.performBatchUpdates({
        self.collectionView?.reloadItemsAtIndexPaths(indexPaths)
        return
        }){
          completed in
          //4
          if self.largePhotoIndexPath != nil {
            self.collectionView?.scrollToItemAtIndexPath(
              self.largePhotoIndexPath!,
              atScrollPosition: .CenteredVertically,
              animated: true)
          }
      }
  }
}

func collectionView(collectionView: UICollectionView,
  layout collectionViewLayout: UICollectionViewLayout,
  sizeForItemAtIndexPath indexPath: NSIndexPath) -> CGSize {
 
  let Photo = photoForIndexPath(indexPath)
 
  // New code
  if indexPath == largePhotoIndexPath {
    var size = collectionView.bounds.size
    size.height -= topLayoutGuide.length
    size.height -= (sectionInsets.top + sectionInsets.right)
    size.width -= (sectionInsets.left + sectionInsets.right)
    return Photo.sizeToFillWidthOfSize(size)
  }
  // Previous code
  if var size = Photo.thumbnail?.size {
    size.width += 10
    size.height += 10
    return size
  }
  return CGSize(width: 100, height: 100)
}

extension ViewController : UICollectionViewDelegate {
 
  override func collectionView(collectionView: UICollectionView,
    shouldSelectItemAtIndexPath indexPath: NSIndexPath) -> Bool {
      if largePhotoIndexPath == indexPath {
        largePhotoIndexPath = nil
      }
      else {
        largePhotoIndexPath = indexPath
      }
      return false
  }
}

override func collectionView(collectionView: UICollectionView, cellForItemAtIndexPath indexPath: NSIndexPath) -> UICollectionViewCell {
 
  let cell = collectionView.dequeueReusableCellWithReuseIdentifier(
    reuseIdentifier, forIndexPath: indexPath) as! yourCellName
  let Photo = photoForIndexPath(indexPath)
 
  //1
  cell.activityIndicator.stopAnimating()
 
  //2
  if indexPath != largePhotoIndexPath {
    cell.imageView.image = Photo.thumbnail
    return cell
  }
 
  //3
  if Photo.largeImage != nil {
    cell.imageView.image = Photo.largeImage
    return cell
  }
 
  //4
  cell.imageView.image = Photo.thumbnail
  cell.activityIndicator.startAnimating()
 
  //5
  Photo.loadLargeImage {
    loadedPhoto, error in
 
    //6
    cell.activityIndicator.stopAnimating()
 
    //7
    if error != nil {
      return
    }
 
    if loadedPhoto.largeImage == nil {
      return
    }
 
    //8
    if indexPath == self.largePhotoIndexPath {
      if let cell = collectionView.cellForItemAtIndexPath(indexPath) as? yourCellName {
        cell.imageView.image = loadedPhoto.largeImage
      }
    }
  }
 
  return cell
}

Here the Name "Photo" stands for the name of the UIImage and "yourCellName" stands for the name of the UICollectionViewCell.

Outputs:

                 Before Click                                                       After Click


Wednesday 3 August 2016

MKMapView for required location using Latitude and Longitude - iOS Swift

This Code will be really useful to find the location of the required place. We need to give latitude and longitude as Input .

For example :
     
      Here I want to Find the location of S2 Theatre, Thiruvanmiyur, Chennai . So, First I want to collect the latitude and longitude of the location.
                                   Latitude    =  12.9895  Longitude = 80.2565
Step 1 :
               Insert a Mapview in Main storyboard and also Create an IBOutlet for MKMapView in View Controller.
Step 2 :
               Copy this code into the viewDidLoad. Inside the variable location you have to include the latitude and longitude. Inside the variable span you have to include the zooming size that which required. Annotation is nothing but the marker present in the location.

        let location = CLLocationCoordinate2DMake(12.9895, 80.2565) 
        let span = MKCoordinateSpanMake(0.0002, 0.0002)
    
        let region = MKCoordinateRegion(center: location,span: span)
    
        mapView.setRegion(region, animated: true)
        
        let annotation = MKPointAnnotation()
        annotation.coordinate = location
        annotation.title = "S2 Theatre"
        
        mapView.addAnnotation(annotation)


Output :
                                        

Tuesday 2 August 2016

Add button to the UIToolbar - iOS Swift

This code will really helpful to add button to the UIToolbar present in keyboard or pickerview.

For example:
If you want "Done" button to be inserted in the toolbar of the pickerview. you just have to follow simple steps as follows.

Step 1:
Have to include this code inside "viewDidLoad" to create "Done" button in UIToolbar. "textBoxText" is the name of the Text field.

      
        // create done button in toolbar.
        doneToolbar = UIToolbar(frame: CGRectMake(0, 0, self.view.frame.size.width, 50))
        doneToolbar.barStyle = UIBarStyle.Default
        doneToolbar.items =   [UIBarButtonItem(title: "Done", style: UIBarButtonItemStyle.Plain, target: self, action: #selector(FirstViewController.PickerDoneButtonTapped))]
        doneToolbar.sizeToFit()
        textBoxText.inputAccessoryView = doneToolbar


Step 2:
Code the function of "Done" button that has included in the UIToolbar. I have given that if  "Done" button is tapped the PickerView have to disable.

    func PickerDoneButtonTapped()
    {
        textBoxText.resignFirstResponder()
    }

Step 3:
Have to call the function in "viewDidload"

self.PickerDoneButtonTapped()

Output:


Sunday 31 July 2016

CodeQuality & BestPractice for Android - (rudiments) Part - I


Please find the below link to download the powerpoint presentations.  This presentations will be a self explanatory and it helps the tyro programmers to-do the quality code and helps them follow the best practice.


This covers the below concepts for the rudiments level.

Concepts Covered:

0. Quality Measurement
1. Basic Code Standards
–  Organized Files
–  Naming Conventions
–  Anonymous or Nested Class
–  Clean-up Your Code
–  Less Complexity vs Better Readability
–  Nested Control Flows
–  Class Size & Dependencies
–  Avoid Complex Conditions
–  Misc.

2. Basic Android Practices
– Reuse Styles & Resources
– Include Layouts
– Merge – Include - Layouts
– Colors
– Dimensions
– strings.xml
– Activity or Fragment?
– Build Variant
– Signing Configs

All The Very Best :-)
Soon will see you with the Intermediate and Advance level presentations.

Wednesday 15 June 2016

Date Formatting - Java - Android

The below code snippet will be most useful for the tyro's and intermediate developer to format their date values to the expected formats,  no need to worry about the format what we are getting from the JSON or XML values.  Just get the date value and make a input date format and define the separate string for expected output date format and also keep ready with the date value.

1
2
3
 String inputFormat = "EEE, dd MMM yyyy hh:mm:ss Z";
 String dateValue = "Wed, 18 Apr 2012 07:55:29 +0000";
 String outputFormat = "MMM dd,yyyy hh:mm a";

Pass those params to the below utility method to get a expected date format as string.

 1
 2
 3
 4
 5
 6
 7
 8
 9
10
11
12
13
14
15
16
import java.text.ParseException;
import java.text.SimpleDateFormat;
import java.util.Date;

/**
 * Created by rajendhiran.e on 6/15/2016.
 */
public class Utils
{
    public static String DateFormatter(String inputFormat, String outputFormat, String dateValue) throws ParseException {
        SimpleDateFormat dateformat = new SimpleDateFormat(inputFormat);
        Date newDate = dateformat.parse(dateValue);
        dateformat = new SimpleDateFormat(outputFormat);
        return dateformat.format(newDate);
    }
}

Code Snippet:

 1
 2
 3
 4
 5
 6
 7
 8
 9
10
11
12
String Error="";
        try {
            String inputFormat = "EEE, dd MMM yyyy hh:mm:ss Z";
            String dateValue = "Wed, 18 Apr 2012 07:55:29 +0000";
            String outputFormat = "MMM dd,yyyy hh:mm a";
            Log.d("Date Content:", "Value: " + Utils.DateFormatter(inputFormat, outputFormat, dateValue));
        } catch (ParseException e) {
            Error="Parser - Date Formatter Error!";
        } catch (Exception e) {
            Error="Error "+e.getMessage();
        }
        Log.d("Err: ",Error);


Thursday 9 June 2016

Android check Internet and update the user while any changes made on the connectivity or network


If you are developing an Android app you may already fetching information from internet. While doing so there is a chance that internet connection is not available on users handset.

Hence it's always a good idea to check the network state before performing any task that requires internet connection. 

You might also want to check what kind of internet connection is available in handset. For example is wifi currently enabled? or is mobile data network is connected.

Check Internet Connection:
Here is a simple code snippet that will help you identify what kind of internet connection a user has on her device.

First we need following permission in order to access network state. Add following permission to your AndroidManifest.xml file.

Permissions required to access network state:

<uses-permission android:name="android.permission.ACCESS_NETWORK_STATE" />

Now check following utility class NetworkUtil. It has method getConnectivityStatus which returns an int constant depending on current network connection. If wifi is enabled, this method will return TYPE_WIFI. Similarly for mobile data network is returns TYPE_MOBILE. You got the idea!!

There is also method getConnectivityStatusString which returns current network state as a more readable string.

 1
 2
 3
 4
 5
 6
 7
 8
 9
10
11
12
13
14
15
16
17
18
19
20
21
22
23
24
25
26
27
28
29
30
31
 public class NetworkUtil {
    public static int TYPE_WIFI = 1;
    public static int TYPE_MOBILE = 2;
    public static int TYPE_NOT_CONNECTED = 0;

    public static int getConnectivityStatus(Context context) {
        ConnectivityManager cm = (ConnectivityManager) context
                .getSystemService(Context.CONNECTIVITY_SERVICE);
        NetworkInfo activeNetwork = cm.getActiveNetworkInfo();
        if (null != activeNetwork) {
            if (activeNetwork.getType() == ConnectivityManager.TYPE_WIFI)
                return TYPE_WIFI;
            if (activeNetwork.getType() == ConnectivityManager.TYPE_MOBILE)
                return TYPE_MOBILE;
        }
        return TYPE_NOT_CONNECTED;
    }

    public static String getConnectivityStatusString(Context context) {
        int conn = NetworkUtil.getConnectivityStatus(context);
        String status = null;
        if (conn == NetworkUtil.TYPE_WIFI) {
            status = "Wifi enabled";
        } else if (conn == NetworkUtil.TYPE_MOBILE) {
            status = "Mobile data enabled";
        } else if (conn == NetworkUtil.TYPE_NOT_CONNECTED) {
            status = "Not connected to Internet";
        }
        return status;
    }
}

You can use this utility class in your android app to check the network state of the device at any moment. Now this code will return you the current network state whenever the utility method is called. What if you want to do something in your android app when network state changes?

 Let's say when Wifi is disabled, you need to put your android app service to sleep so that it does not perform certain task. Now this is just one usecase. The idea is to create a hook which gets called whenever network state changes. And you can write your custom code in this hook to handle the change in network state

Broadcast Receiver to handle changes in Network state:
You can easily handle the changes in network state by creating your own Broadcast Receiver. Following is a broadcast receiver class where we handle the changes in network.
Check onReceive() method. This method will be called when state of network changes. Here we are just creating a Toast message and displaying current network state. You can write your custom code in here to handle changes in connection state.

1
2
3
4
5
6
7
public class NetworkChangeReceiver extends BroadcastReceiver {
    @Override
    public void onReceive(final Context context, final Intent intent) {
        String status = NetworkUtil.getConnectivityStatusString(context);
        Toast.makeText(context, status, Toast.LENGTH_LONG).show();
    }
}

Once we define our BroadcastReceiver, we need to define the same in AndroidManifest.xml file. Add following to your manifest file.

 1
 2
 3
 4
 5
 6
 7
 8
 9
10
11
12
<application  ...>
     ...
        <receiver
            android:name=".NetworkChangeReceiver"
            android:label="NetworkChangeReceiver" >
            <intent-filter>
                <action android:name="android.net.conn.CONNECTIVITY_CHANGE" />
                <action android:name="android.net.wifi.WIFI_STATE_CHANGED" />
            </intent-filter>
        </receiver>
      ...
</application>

! Done

Thanks to http://viralpatel.net/blogs/android-internet-connection-status-network-change/

Tuesday 24 May 2016

Best Programming Languages You Should Learn To Boost Your Salary


Source: http://fossbytes.com/python-go-scala-learn-best-programming-languages-salary-boost/

The 2016 Workforce-Skill Preparedness Report of Pay-scale, a salary tracking site, is out with many interesting trends related to the current tech job scenario. The report outlines that Go, Scala, and Python, along with big data tech provide the highest boost in your paycheck. if you are willing to grab a big bite of salary boost by learning some new technology or programming language, we are here to help you.It’s a no hidden fact that the knowledge of big data skills is the most in-demand in the tech world.

Today, the job market is witnessing a paradigm shift and big data skills like Hadoop and Apache Spark, along with Python, Go, and Scala, are gaining high in highest paid lists.  Using its pay-tracking database, the same trend in IT and other industries has been observed by Pay-scale.

These results have been published recently in its 2016 Workforce-Skills Preparedness Report. Among the highest valued skills that provide the biggest pay boost, all are tech related. Out of such top nine skills, seven are directly related to the deep knowledge of programming languages, frameworks, and operating systems.

The biggest jump is provided by the functional programming language Scala with an average pay jump of 22.2 percent.  Google’s Go programming language followed Scala at the second place with a 20 percent pay boost.  While Python didn’t crack the top positions in this list, it had a prominent presence in Pay Scale's survey. Depending on the job titles, Python was found to provide a pay boost of up to 8-14 percent.

Here’s the list of top 9 technologies that provide the highest salary jump:


Sunday 22 May 2016

Image Scaling as to the Aspect Ratio - Android


Image Scaling will be huge blocker for the android developers, In our modern world applications are never been without the dynamic images.  So the images has be fitted as to the aspect ration into the views and correspondingly it needs to work on multiple devices and its sizes.

The below code snippet will be really helpful for us.

 1
 2
 3
 4
 5
 6
 7
 8
 9
10
11
12
13
14
15
16
17
18
19
20
21
22
23
24
25
26
27
28
29
30
31
32
33
34
35
36
37
38
39
40
41
42
43
44
45
46
47
public static Bitmap scaleImage(Bitmap view, Context ctx, int size) throws NoSuchElementException {
        Bitmap bitmap = null;
        try {
            bitmap = view;
        } catch (NullPointerException e) {
            throw new NoSuchElementException("No drawable on given view");
        } catch (Exception e) {
   throw new NoSuchElementException("Error: "+e);
        }

        // Get current dimensions AND the desired bounding box
        int width = 0;

        try {
            width = bitmap.getWidth();
        } catch (NullPointerException e) {
            throw new NoSuchElementException("Can't find bitmap on given view/drawable");
        }

        int height = bitmap.getHeight();
        int bounding = dpToPx(size,ctx);
        
        // Determine how much to scale: the dimension requiring less scaling is
        // closer to the its side. This way the image always stays inside your
        // bounding box AND either x/y axis touches it.
        float xScale = ((float) bounding) / width;
        float yScale = ((float) bounding) / height;
        float scale = (xScale <= yScale) ? xScale : yScale;
        Log.i("Test", "xScale = " + Float.toString(xScale));
        Log.i("Test", "yScale = " + Float.toString(yScale));
        Log.i("Test", "scale = " + Float.toString(scale));

        // Create a matrix for the scaling and add the scaling data
        Matrix matrix = new Matrix();
        matrix.postScale(scale, scale);

        // Create a new bitmap and convert it to a format understood by the ImageView
        Bitmap scaledBitmap = Bitmap.createBitmap(bitmap, 0, 0, width, height, matrix, true);
        width = scaledBitmap.getWidth(); // re-use
        height = scaledBitmap.getHeight(); // re-use

        BitmapDrawable result = new BitmapDrawable(scaledBitmap);
        
        // Apply the scaled bitmap
       // view.setImageDrawable(result);
        return scaledBitmap;
    }

1
2
3
4
public static int dpToPx(int dp, Context ctx) {
        float density = ctx.getResources().getDisplayMetrics().density;
        return Math.round((float)dp * density);
    }

 1
 2
 3
 4
 5
 6
 7
 8
 9
10
11
12
13
14
15
16
 Glide.with(context)
                .load(url)
                .asBitmap()
                .centerCrop()
                .skipMemoryCache(true)
                .diskCacheStrategy(DiskCacheStrategy.NONE)
                .error(R.drawable.profile)
                .placeholder(R.drawable.profile)
                .into(new BitmapImageViewTarget(viewHolder.txt_jobseekerImage) {
                    @Override
                    protected void setResource(Bitmap resource) {
                // Do bitmap magic here
                        resource = CommonUtil.scaleImage(resource, context);
                        super.setResource(resource);
                    }
                });

Tuesday 19 April 2016

Encode and Decode the Bitmap to Base64 String and vice versa

// Encode the Bitmap to Base64 String:

 1
 2
 3
 4
 5
 6
 7
 8
 9
10
public static String encodeTobase64(Bitmap image) {
        Bitmap immagex = image;
        ByteArrayOutputStream baos = new ByteArrayOutputStream();
        immagex.compress(Bitmap.CompressFormat.JPEG, 100, baos);
        byte[] b = baos.toByteArray();
        String imageEncoded = Base64.encodeToString(b, Base64.DEFAULT);

        Log.e("LOOK", imageEncoded);
        return imageEncoded;
    }

Decode the Base64 String to Bitmap:

1
2
3
4
public static Bitmap decodeBase64(String input) {
        byte[] decodedByte = Base64.decode(input, 0);
        return BitmapFactory.decodeByteArray(decodedByte, 0, decodedByte.length);
    }